AD:
マルチドメインSSLというのものが存在することを、今回はじめて知りました。
WildcardSSLはたまに使っていましたが、今はマルチドメインSSLなんてあるんですね。
便利な世の中になりました。
読んで字のごとく、一つにCertificateで複数ドメインをサポートするものです。
で、csrを作成しないと行けなかったのですが、今までのCSRの作成方法では基本1つしかドメインを指定できないので、すこし違うのでメモしておきます。
OpenSSL Config Fileをコピー
OpenSSL Config Fileをコピーして編集します。
|
|
cp /etc/ssl/openssl.cnf /var/www/example.com/cert/example.com.cnf |
Editing Config File
|
|
vi /var/www/example.com/cert/example.com.cnf // ここをコメントアウト #req_extensions = v3_req to req_extensions = v3_req |
[ v3_req ] の部分を検索して下記のパラメーターを追加
|
|
subjectAltName = @alt_names |
今回対象のドメインを下記のように追加してください。
|
|
[ alt_names ] DNS.1 = www.example.com DNS.2 = example.com |
OpenSSL Private Key & CSR
Private keyを作成します。
|
|
openssl genrsa -out example.com.key 2048 |
このKeyと先程のexample.com.cnfを使ってCSRを作成します。
|
|
openssl req -new -key example.com.key -out example.com.csr -config example.com.cnf |
Test
|
|
openssl req -in example.com.csr -noout -text |
で追加したドメインがこんな感じみれたらOKです。
|
|
Certificate Request: Data: Version: 0 (0x0) Subject: C=IN, ST=MH, L=PUNE, O=RTCAMP SOLUTIONS PRIVATE LIMITED., CN=www.example.com/emailAddress=admin@example.com [...] X509v3 Basic Constraints: CA:FALSE X509v3 Key Usage: Digital Signature, Non Repudiation, Key Encipherment X509v3 Subject Alternative Name: DNS:www.example.com, DNS:example.com [...] |
参考先
https://easyengine.io/wordpress-nginx/tutorials/ssl/multidomain-ssl-subject-alternative-names/
Twitter: 0 | Facebook: 0 | Google Plus: 0 | Hatena: 0 | Pocket: 0 | Total: 0 | Feedly: 0
AD:
先日Xserverにメールサーバを変更したら、phpのMail()で送っているメールが届かなくなりました。
でMaillog(tail -f /var/log/maillog)を見てみると下記のようにエラーがでておりました。
|
|
Mar 13 19:42:56 ip-10-130-82-103 sendmail[11076]: aaaa: to=<info@hogehoge.com>, ctladdr=<apache@local-hostname> (48/48), delay=00:00:01, xdelay=00:00:01, mailer=esmtp, pri=152169, relay="ドメインのMXレコードに指定してあるドメイン". [X.X.X.X], dsn=4.1.8, stat=Deferred: 450 4.1.8 <apache@local-hostname>: Sender address rejected: Domain not found |
はじめは、DNSがうまくひけていないかと思って、サーバ(CentOS)のDNS回りの見ていたんですが、最終的のFromで指定しているDomainがSendmailにうまく渡せていないので、ctladdr=になっているのが問題だとわかりました。(今から書く内容をもとに予測しているだけですが)
解決方法
php5から導入されたmail.force_extra_parametersを使ってsendmail -f でメール指定することにしました。
|
|
vi /etc/php.ini mail.force_extra_parameters = -f info@hogehoge.com |
この設定だとphpがSendmailを使って送る際にすべて-fに適応されるので、おすすめできないのですが、このサーバあと1ヶ月で閉じる予定で、phpもこのinfo@hogehoge.comにしか送らないので対応できました。
本来ならSendmail.cfや/etc/sysconfig/networkに$HOSTNAMEを指定するなどの対策のほうがいいかと思います。
Twitter:
Warning: Undefined array key "Twitter" in /home/sazaeau/mizoshiri.com/public_html/blog.mizoshiri.com/wp-content/plugins/sns-count-cache/sns-count-cache.php on line 2897
0 | Facebook: 0 | Google Plus:
Warning: Undefined array key "Google+" in /home/sazaeau/mizoshiri.com/public_html/blog.mizoshiri.com/wp-content/plugins/sns-count-cache/sns-count-cache.php on line 2897
0 | Hatena: 0 | Pocket: 0 | Total: 0 | Feedly: 0
AD:
先日AWSのBuilding a Modern Data Architectureのイベントに行ってきたのでそのメモです。
イベントはどちらかというとDevOpsやBIの人たち向けでしたが、大変勉強になりました。
AWSのサービスが多すぎて正直どんなサービスがあって、どのように使えばいいのかわからなかったのですが、具体的にグラフを元に説明してくれたので勉強になりました。
AWSでモダンなBigDataを扱う構成のグラフです。
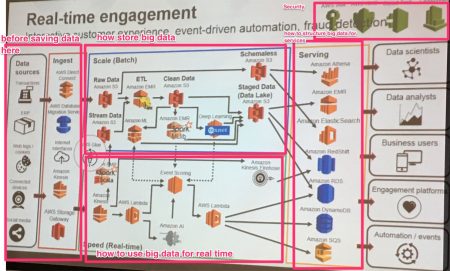
各種サービスはこちらになります。
- Amazon QuickSight – BI tools for AWS DB service – tableau, and more dashboard tools
- Amazon Athena – Interactive query service that makes it easy to analyze data in Amazon S3 using standard S
- Amazon Kinesis – Collect and process large streams of data records in real time
- Amazon Lambda – event-driven, serverless computing platform
- Amazon Polly – text to real voice
- Amazon Lex – Build Conversation Bots,
- Amazon Rekognition- Image recognition, place & face
- Amazon DynamoDB – Fast and flexible NoSQL database service for any scale
- Amazon Simple Queue Service (SQS) – Simple Queue system
もしBigDataやAWSのサービスをもっと知りたい場合はこちらを利用したらって
https://aws.amazon.com/podcasts/aws-techchat-subscribe/
https://aws.amazon.com/jp/blogs/big-data/
Twitter:
Warning: Undefined array key "Twitter" in /home/sazaeau/mizoshiri.com/public_html/blog.mizoshiri.com/wp-content/plugins/sns-count-cache/sns-count-cache.php on line 2897
0 | Facebook: 0 | Google Plus:
Warning: Undefined array key "Google+" in /home/sazaeau/mizoshiri.com/public_html/blog.mizoshiri.com/wp-content/plugins/sns-count-cache/sns-count-cache.php on line 2897
0 | Hatena: 0 | Pocket: 0 | Total: 0 | Feedly: 0
AD:
こんな感じで、masterでなく、branch_name_hogeをpushします。
|
|
git push heroku branch_name_hoge:master |
その後、別のbranch(branch_name_hoge2)でpushしたくなって、下記のようにpushします。
|
|
git push heroku branch_name_hoge2:master |
でも、pushするまえに、一回Pullしてよとか、言われる場合があります。
そんな時は-fを入れて強制的にpushすればOkです。
|
|
git push heroku branch_name_hoge2:master -f |
Twitter: 0 | Facebook: 0 | Google Plus: 0 | Hatena: 0 | Pocket: 0 | Total: 0 | Feedly: 0
AD:
先日バックアップも何もない環境で、ディスク・スペースが100%になり急遽パーミッションを追加してサイトのフォルダの移設が必要なったのですが、サイトのいたるところにシンボリックリンがはられていて、シンボリックリンク(ハードも含めて)の削除がどのようになるか、非常に怖かったのメモしておきます。
シンボリックリンクを削除したらリンク元も消えるのか気になったのですが、unlinkで削除すれば参照元は消えることはないようです。
ですが、リンクしていたファイルは消えるので、必要な場合はcpなどでファイルを持ってきておきます。
|
|
$ cd /home/hoge/ $ ls -al setting.php -> /var/www/test/setting.php $ unlink ./setting.php $ ls -al .. $ cp /var/www/test/setting.php ./ |
Twitter:
Warning: Undefined array key "Twitter" in /home/sazaeau/mizoshiri.com/public_html/blog.mizoshiri.com/wp-content/plugins/sns-count-cache/sns-count-cache.php on line 2897
0 | Facebook: 0 | Google Plus:
Warning: Undefined array key "Google+" in /home/sazaeau/mizoshiri.com/public_html/blog.mizoshiri.com/wp-content/plugins/sns-count-cache/sns-count-cache.php on line 2897
0 | Hatena: 0 | Pocket: 1 | Total: 1 | Feedly: 0
AD:
Macを強制終了したら、VagrantとVirtualBoxのリンクがなぜか切れて、vagrant upで立ち上げると新規にBoxをつくろうとするトラブルにあいました。
で、調べたところ.vagrantがもっているVirtualBoxのIDを設定がなくっているようなので、調べてつなげてあげて解決できました。
解決方法
|
|
$ VBoxManage list vms "Boxの名前" {1d2d2dee0-b3ad-4d7d-9e14-ca3d24a8s4f50}//UUID |
このUUIDをコピーしてきます。そのあと下記のファイルに追加して完了です。
|
|
$ vi .vagrant/machines/default/virtualbox/id 1d2d2dee0-b3ad-4d7d-9e14-ca3d24a8s4f50 |
Twitter:
Warning: Undefined array key "Twitter" in /home/sazaeau/mizoshiri.com/public_html/blog.mizoshiri.com/wp-content/plugins/sns-count-cache/sns-count-cache.php on line 2897
0 | Facebook: 0 | Google Plus:
Warning: Undefined array key "Google+" in /home/sazaeau/mizoshiri.com/public_html/blog.mizoshiri.com/wp-content/plugins/sns-count-cache/sns-count-cache.php on line 2897
0 | Hatena: 1 | Pocket: 1 | Total: 2 | Feedly: 0
AD:
環境
Ruby 2.2.1
Rails 4.2.1
Ubuntu 14.04
でcapybara-webkitをインストールしようとしたら下記のエラーがでました。
1 2 3 4 5 6 7 8 9 10 11 12 13 14 15 16 17 18 19 20 21 22 23 24 25 26 27 28 29 30 31 32 33 |
qmake: could not find a Qt installation of '' *** extconf.rb failed *** Could not create Makefile due to some reason, probably lack of necessary libraries and/or headers. Check the mkmf.log file for more details. You may need configuration options. Provided configuration options: --with-opt-dir --without-opt-dir --with-opt-include --without-opt-include=${opt-dir}/include --with-opt-lib --without-opt-lib=${opt-dir}/lib --with-make-prog --without-make-prog --srcdir=. --curdir --ruby=/home/vagrant/.rbenv/versions/2.2.1/bin/$(RUBY_BASE_NAME) --with-gl-dir --without-gl-dir --with-gl-include --without-gl-include=${gl-dir}/include --with-gl-lib --without-gl-lib=${gl-dir}/lib --with-zlib-dir --without-zlib-dir --with-zlib-include --without-zlib-include=${zlib-dir}/include --with-zlib-lib --without-zlib-lib=${zlib-dir}/lib Command 'qmake ' failed extconf failed, exit code 1 |
解決方法
エラー通りqmakeがないので、入れてあげて解決です。
|
|
sudo apt-get install qt5-default libqt5webkit5-dev |
Twitter:
Warning: Undefined array key "Twitter" in /home/sazaeau/mizoshiri.com/public_html/blog.mizoshiri.com/wp-content/plugins/sns-count-cache/sns-count-cache.php on line 2897
0 | Facebook: 0 | Google Plus:
Warning: Undefined array key "Google+" in /home/sazaeau/mizoshiri.com/public_html/blog.mizoshiri.com/wp-content/plugins/sns-count-cache/sns-count-cache.php on line 2897
0 | Hatena: 0 | Pocket: 0 | Total: 0 | Feedly: 0
AD:
Namecheapさんで、Comodo PositiveSSLを購入して、apache + mod_sslの環境下に設定したので、来年のためにメモ

登録用のCSRの作成
|
|
$ openssl req -new -newkey rsa:2048 -nodes -keyout server.key -out server.csr Country Name (2 letter code) [AU]:AU State or Province Name (full name) [Some-State]:New South Wales Locality Name (eg, city) []:Sydney Organization Name (eg, company) [Internet Widgits Pty Ltd]:会社名だよ Organizational Unit Name (eg, section) []: Common Name (e.g. server FQDN or YOUR name) []:ドメイン Email Address []:メールアドレス |
証明書の認証
購入後、SSL Certificatesの画面よりActiveにする。
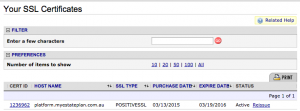
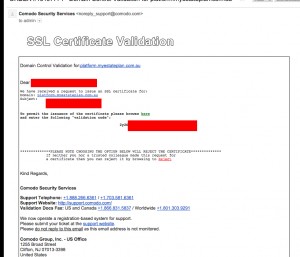
すると登録した確認用メールに下記のようなメールが届きます。
validation codeがあるので、それを使用して認証をすすめます。
次に、サーバに設置するようの鍵ファイルが送られてきます。
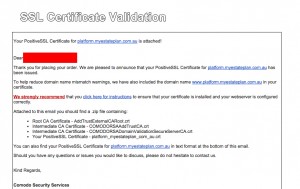
こんな感じの証明書ですね
– Root CA Certificate – AddTrustExternalCARoot.crt
– Intermediate CA Certificate – COMODORSAAddTrustCA.crt
– Intermediate CA Certificate – COMODORSADomainValidationSecureServerCA.crt
– Your PositiveSSL Certificate – ドメイン名.crt
証明書を作る
上記の鍵から証明書を作る
やっていることは、単純に3つの鍵をドメイン.cerにまとめているだけです。
|
|
cat COMODORSAAddTrustCA.crt COMODORSADomainValidationSecureServerCA.crt AddTrustExternalCARoot.crt > ドメイン.cer |
apacheに設置
|
|
$ sudo vi /etc/apache2/sites-available/default-ssl # メールで添付させてきたもの SSLCertificateFile /home/user/ssl-key/ドメイン.crt # 一番はじめに自分で作ったもの SSLCertificateKeyFile /home/user/ssl-key/server.key # 3っつのファイルをまとめたもの SSLCACertificateFile /home/user/ssl-key/ドメイン.cer |
Twitter:
Warning: Undefined array key "Twitter" in /home/sazaeau/mizoshiri.com/public_html/blog.mizoshiri.com/wp-content/plugins/sns-count-cache/sns-count-cache.php on line 2897
0 | Facebook: 0 | Google Plus:
Warning: Undefined array key "Google+" in /home/sazaeau/mizoshiri.com/public_html/blog.mizoshiri.com/wp-content/plugins/sns-count-cache/sns-count-cache.php on line 2897
0 | Hatena: 1 | Pocket: 1 | Total: 2 | Feedly: 0
AD:
こんな感じのファイル郡を一括にhtmlからphpに変更したい場合
|
|
$ ls index.html test.html contactus.html |
解決方法
|
|
$ for f in *.html; do mv $f ${f%.html}.php; done |
Twitter:
Warning: Undefined array key "Twitter" in /home/sazaeau/mizoshiri.com/public_html/blog.mizoshiri.com/wp-content/plugins/sns-count-cache/sns-count-cache.php on line 2897
0 | Facebook: 0 | Google Plus:
Warning: Undefined array key "Google+" in /home/sazaeau/mizoshiri.com/public_html/blog.mizoshiri.com/wp-content/plugins/sns-count-cache/sns-count-cache.php on line 2897
0 | Hatena: 0 | Pocket: 0 | Total: 0 | Feedly: 0
AD:
いろいろなやり方があるとは思うのですが、僕は下記のやり方で対応しました。
1.ローカルのデータをInsert文でDumpする
|
|
pg_dump -d your_database -t table_nme > specific_table_dump.sql --inserts |
–insertsの引数なしだとPostgresはCOPY文で出されるので、それだとHerokuに移す場合面倒なので、入れています。

2.HerokuのDBへPgAdminなどでつなげる
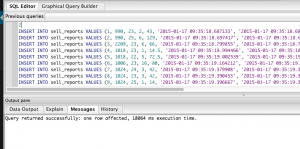
3.あとは上で作ったファイルをSQLを実行して終了
Twitter:
Warning: Undefined array key "Twitter" in /home/sazaeau/mizoshiri.com/public_html/blog.mizoshiri.com/wp-content/plugins/sns-count-cache/sns-count-cache.php on line 2897
0 | Facebook: 0 | Google Plus:
Warning: Undefined array key "Google+" in /home/sazaeau/mizoshiri.com/public_html/blog.mizoshiri.com/wp-content/plugins/sns-count-cache/sns-count-cache.php on line 2897
0 | Hatena: 0 | Pocket: 1 | Total: 1 | Feedly: 0


