ncduでUbuntuのフォルダの容量を可視化するのが便利する義理
Nov 19, 2019
sudo apt install ncdu
ncdu ./
Twitter: 0 | Facebook: 0 | Google Plus: 0 | Hatena: 0 | Pocket: 0 | Total: 0 | Feedly: 0
sudo apt install ncdu ncdu ./
Twitter: 0 | Facebook: 0 | Google Plus: 0 | Hatena: 0 | Pocket: 0 | Total: 0 | Feedly: 0
先日AWSのBuilding a Modern Data Architectureのイベントに行ってきたのでそのメモです。
イベントはどちらかというとDevOpsやBIの人たち向けでしたが、大変勉強になりました。
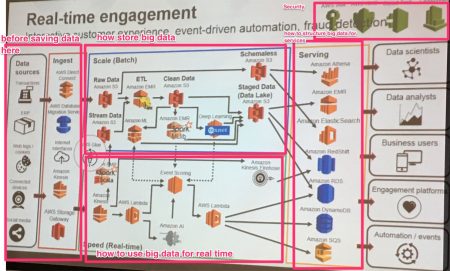
AWSのサービスが多すぎて正直どんなサービスがあって、どのように使えばいいのかわからなかったのですが、具体的にグラフを元に説明してくれたので勉強になりました。
AWSでモダンなBigDataを扱う構成のグラフです。

各種サービスはこちらになります。
もしBigDataやAWSのサービスをもっと知りたい場合はこちらを利用したらって
https://aws.amazon.com/podcasts/aws-techchat-subscribe/
https://aws.amazon.com/jp/blogs/big-data/
Twitter:
Warning: Undefined array key "Twitter" in /home/sazaeau/mizoshiri.com/public_html/blog.mizoshiri.com/wp-content/plugins/sns-count-cache/sns-count-cache.php on line 2897
0 | Facebook: 0 | Google Plus:
Warning: Undefined array key "Google+" in /home/sazaeau/mizoshiri.com/public_html/blog.mizoshiri.com/wp-content/plugins/sns-count-cache/sns-count-cache.php on line 2897
0 | Hatena: 0 | Pocket: 0 | Total: 0 | Feedly: 0
AmazonEC2を設定していて、sshのユーザ専用のユーザを作成するなどいろいろやっていたら、rootのパスワードが認証できなくって
すこしあせりました。
でも、ひとつのsshがロートでログインしたままだったので、そいつからpasswdコマンド打つとなんかエラーがでました。
|
1 2 3 |
#passwd root Changing password for user root. passwd: Authentication token manipulation error |
で、エラーがでればあとは調べるのみなので、pwconvで回復できるとのこと
|
1 |
#pwconv |
そのあとに、passwdを入力すると問題なく行けました。
あーびっくりした。
せっかくいろいろと設定したのに、またやり直しかと思いました。
パスワードが/etc/shadowと/etc/passwdとで整合性が取れなくなるとでるようです。
Twitter:
Warning: Undefined array key "Twitter" in /home/sazaeau/mizoshiri.com/public_html/blog.mizoshiri.com/wp-content/plugins/sns-count-cache/sns-count-cache.php on line 2897
0 | Facebook: 0 | Google Plus:
Warning: Undefined array key "Google+" in /home/sazaeau/mizoshiri.com/public_html/blog.mizoshiri.com/wp-content/plugins/sns-count-cache/sns-count-cache.php on line 2897
0 | Hatena: 0 | Pocket: 0 | Total: 0 | Feedly: 0
サーバの切り替え作業をしなくていけなくなったので、せっかくなのでAmazon EC2を提案しようと思っております。
でも、提案する前に調査をしとかないと後で、できませんは怒られそうなので。。。
あと、せっかくなので、日本でいたとき自宅サーバに使用していたドメインがあるのでそいつを有効利用します。
これではやりのクラウドデビューです。

ユーザ登録は、だいぶ前にしていたのでそのユーザ情報を調べるのに時間がかかりましたが、無事ログイン完了
そのあとに、Amazon EC2に行って、クレジット情報などを入力していきます。
その後、手続きを進めていき、「Private Key File」と「X.509 certificate file」を取得します。
Amazon EC2は、Firefoxのプラグインで操作する方法と、コマンドから捜査する方法があるようです。
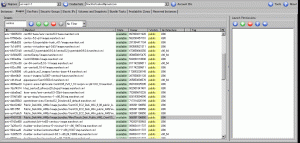
FirefoxのプラグインのElasticfoxインストールして、ユーザ登録した際にもらった「Access Key」と「Secret Access Key」を入力したら
簡単に使えるになりました。

完全に把握しきれていないですが、こっちのほうが一行づつやっていくので頭の中に入りやすいです。
まず、APIを落としてきます。
http://developer.amazonwebservices.com/connect/entry.jspa?externalID=351&categoryID=88
あと、APIはJave環境で動くようなので、Javaが入っていない方は、事前にインストールしておいてください。
ちなみに、私の開発環境はWindowsです。
ダウンロードしてきたものを、回答してC:直下や、自分の作業ディレクトリにおいておきます。
そして、コマンドプロンプトで下記のコマンド貼り付けます。
これでWindowsに環境変数を設定します。
|
1 2 3 4 5 |
set JAVA_HOME=C:Program FilesJavajre6 <font color="red">←Javaのインストール先</font> set EC2_HOME=C:hogeec2-api-tools-1.3-36506 <font color="red">←APIを設置したディレクトリ</font> set PATH=%PATH%;%EC2_HOME%bin set EC2_PRIVATE_KEY=%EC2_HOME%pk-6P3IM**************.pem <font color="red">←管理画面からダウンロードした鍵ファイル</font> set EC2_CERT=%EC2_HOME%cert-6P***********************.pem <font color="red">←管理画面からダウンロードした鍵ファイル</font> |
そのあとに、「ec2ver」を実行して下記の内容が表示されると成功です。
|
1 2 |
C:Document and Settingshogeec2ver 1.3-3*** 2009-04-04 |
あとは、Elasticfoxでも、コマンドからでもどっちからでもいいので、AMI(Amazon Machine Image)を選択して
立ち上げて、ポートを開けたりしたら接続可能です。
いろいろとやならけばならいですが、下記のサイトを参考やったら僕はできましたので皆さんもお試しあれ
ちなみに、ぼくはCentOS5のサーバを選択しました。
http://kawa.at.webry.info/200902/article_3.html
川崎さん、ありがとうございます。
Twitter:
Warning: Undefined array key "Twitter" in /home/sazaeau/mizoshiri.com/public_html/blog.mizoshiri.com/wp-content/plugins/sns-count-cache/sns-count-cache.php on line 2897
0 | Facebook: 0 | Google Plus:
Warning: Undefined array key "Google+" in /home/sazaeau/mizoshiri.com/public_html/blog.mizoshiri.com/wp-content/plugins/sns-count-cache/sns-count-cache.php on line 2897
0 | Hatena: 2 | Pocket: 0 | Total: 2 | Feedly: 0
Today I check some Linux servers.
So I wrote some commands for checking hardware about server.
|
1 |
cat /proc/cpuinfo |
|
1 |
cat /proc/meminfo |
|
1 |
df -mh |
|
1 |
cat /etc/redhat-release |
|
1 |
lspci |
Twitter:
Warning: Undefined array key "Twitter" in /home/sazaeau/mizoshiri.com/public_html/blog.mizoshiri.com/wp-content/plugins/sns-count-cache/sns-count-cache.php on line 2897
0 | Facebook: 0 | Google Plus:
Warning: Undefined array key "Google+" in /home/sazaeau/mizoshiri.com/public_html/blog.mizoshiri.com/wp-content/plugins/sns-count-cache/sns-count-cache.php on line 2897
0 | Hatena: 0 | Pocket: 0 | Total: 0 | Feedly: 0
友人から購入したHP 2133(スタンダードモデル)のVistaがあまりにも遅すぎたので、前から触ってみたかったUbuntu 8.10を入れた時のメモです。
ネットで調べていると、8.04 とかの情報がでてきてたが、ドライバ、VGA関係でなかなか一筋縄ではいかなさそうでしたが、8.10なら対応しているだろうと安直な考えで導入することにしました。
Ubuntu 8.10の日本語パッケージ
本家はこちらから
落してきた、isoをCD-Rにやきます。
ぼくは、このソフトを使って普段はやっています。
CD Manipulator
では、さっそくインストールです。
HP 2133には、ドライブがないので外付けをドライブを準備します。
まずF10で、BIOS SETUP UTILITYからSystem ConfigurationsにいってBootの優先順位を、USBのドライブに変更します。

しばらくCD-Rの読み込みがあって、問題なければ下記の画面がでます。

で、ここでF6をおして起動オプションに下記の内容を追加してください。
xforcevesa
上記のオプションは、8.04をインストール際に必要なことは、ネットで調べていたのですが、8.10でクリアされていると思い試したのですが、
インストール途中で、とまり無理でした。
大変参考になったサイト
HP 2133 Mini-Note
あと、英語キーボードについて
HP 2133は、英語配列のキーボードなので、湘南画材研究所@MTのサイトを参考に
インストールさせてもらいました。
Armenia > Armenia
を選択して、記号などの入力を確認しました。
あとは、普通にインストールの手順にそって進んでいってもらえると問題なくインストールできます。

まだ、無線Lan関係の設定していないので、調べないといけないなぁ
一度さわってみたかった、Ubuntuのデスクトップ、なんかおすすめアプリなどありましたら、教えてください。
Twitter:
Warning: Undefined array key "Twitter" in /home/sazaeau/mizoshiri.com/public_html/blog.mizoshiri.com/wp-content/plugins/sns-count-cache/sns-count-cache.php on line 2897
0 | Facebook: 0 | Google Plus:
Warning: Undefined array key "Google+" in /home/sazaeau/mizoshiri.com/public_html/blog.mizoshiri.com/wp-content/plugins/sns-count-cache/sns-count-cache.php on line 2897
0 | Hatena: 1 | Pocket: 0 | Total: 1 | Feedly: 0
生成したいユーザで、ログインしてください。
|
1 2 3 4 5 6 7 |
# su - hogehoge # ssh-keygen -t rsa 以下自動で表示する Generating public/private rsa key pair. Enter file in which to save the key (/home/hogehoge/.ssh/id_rsa):<span>パスを指定したい場合は記入</span> Enter passphrase (empty for no passphrase):<span>パスワードを入力</span> Enter same passphrase again:<span>上と同じパスワードを入力</span> |
指定した場合は、そのパスの下に行ってid_rsaファイルをコピペかftpで
ローカルに落してくるSSH接続時の鍵として保存する。
|
1 2 3 4 5 6 7 |
# cd .ssh # ll -a drwx------ 2 hoge hoge 4096 10月 7 00:08 . drwxr-xr-x 27 hoge hoge 4096 10月 7 00:12 .. -rw------- 1 hoge hoge 1743 10月 7 00:08 id_rsa -rw-r--r-- 1 hoge hoge 409 10月 7 00:08 id_rsa.pub #mv id_rsa.pub authorized_keys <span> ← 公開鍵</span> |
保存が完了したら不要なので削除しておく
|
1 |
# rm id_rsa |
sshの設定はなるべくサーバがおいてある現地でやってください。
もし失敗などして、ログインできなくなると怖いですので。。。
|
1 2 3 4 5 6 7 8 9 10 11 12 |
# vi /etc/ssh/sshd_config Protocol 2 <span> ← SSH2のみでの接続許可</span> ListenAddress 0.0.0.0 PermitRootLogin no <span> ← rootでのログインを禁止</span> StrictModes yes <span>SSHへのログインを許可する前に、sshdがユーザのホームディレクトリや、.sshディレクトリをチェックします StrictModesをyesに設定した状態で、ホームディレクトリのGroup・Otherにwrite属性がついていると、ログインを拒否します 参考サイト:<a href="http://www.oji.ath.cx/debian/openssh_01.shtml">oji屋</a></span> RSAAuthentication yes <span> ← RSA認証を許可</span> PasswordAuthentication no <span> ← パスワードなしでもログイン禁止</span> #Limit User AllowUsers hogehoge<span> ← ログインできるユーザを指定</span> |
sshの再起動して終了です。
|
1 |
# /etc/rc.d/init.d/sshd restart |
鍵ファイルを使ってログインを試してください。
ぼくは、TeraTerm派です。
UTF-8対応TeraTerm Proを使ってリストに登録して自動でログインできるようにしています。
これが結構便利です。
Twitter:
Warning: Undefined array key "Twitter" in /home/sazaeau/mizoshiri.com/public_html/blog.mizoshiri.com/wp-content/plugins/sns-count-cache/sns-count-cache.php on line 2897
0 | Facebook: 0 | Google Plus:
Warning: Undefined array key "Google+" in /home/sazaeau/mizoshiri.com/public_html/blog.mizoshiri.com/wp-content/plugins/sns-count-cache/sns-count-cache.php on line 2897
0 | Hatena: 0 | Pocket: 1 | Total: 1 | Feedly: 0
設定方法は2種類あります。
ひとつが「/etc/crontab」に直接記入する方法
もう一つが「crontab -e」で「/var/spool/cron/ユーザー名」に記入する方法
rootユーザでしか編集できませんが
記述方法:
分 時 日 月 曜日 ユーザ コマンド
実行するユーザーがコマンドの前に必要です。
|
1 2 3 |
$ vi /etc/crontab 00 10 * * 4 root /usr/bin/wget http://www.google.com 00 11 * * 4 root /usr/bin/wget http://www.yahoo.com |
(毎週水曜日の10:00 に コマンド[ /usr/bin/wget http://www.google.com ] を実行 する)
(毎週水曜日の11:00 に コマンド[ /usr/bin/wget http://www.yahoo.com ] を実行 する)
実行したユーザの専用ファイル /var/spool/cron/ユーザ名を編集することになる
記述方法:
分 時 日 月 曜日 コマンド
コマンドの前にユーザは必要ありません。
|
1 2 3 |
$ crontab -e 00 10 * * 4 /usr/bin/wget http://www.google.com 00 11 * * 4 /usr/bin/wget http://www.yahoo.com |
(毎週水曜日の10:00 に コマンド[ /usr/bin/wget http://www.google.com ] を実行 する)
(毎週水曜日の11:00 に コマンド[ /usr/bin/wget http://www.yahoo.com ] を実行 する)
|
1 2 3 |
$ crontab -l 00 10 * * 4 /usr/bin/wget http://www.google.com 00 11 * * 4 /usr/bin/wget http://www.yahoo.com |
Twitter:
Warning: Undefined array key "Twitter" in /home/sazaeau/mizoshiri.com/public_html/blog.mizoshiri.com/wp-content/plugins/sns-count-cache/sns-count-cache.php on line 2897
0 | Facebook: 0 | Google Plus:
Warning: Undefined array key "Google+" in /home/sazaeau/mizoshiri.com/public_html/blog.mizoshiri.com/wp-content/plugins/sns-count-cache/sns-count-cache.php on line 2897
0 | Hatena: 18 | Pocket: 10 | Total: 31 | Feedly: 0
下記のようになった場合
|
1 2 |
[root@sever ~]# su - hoge This account is currently not available. |
/etc/passwdから、ユーザのシェルの設定を確認します。
|
1 2 |
[root@sever ~]# grep hoge /etc/passwd hoge:x:100:100::/home/hoge/:/nobin/nologin |
「/nobin/nologin」になっていると、rootでもログインできないので、
「/nobin/nologin」を「/bin/bash」などにしてやるとログインできるようになります。
|
1 |
[root@sever ~]# usermod -s /bin/bash hoge |
じょこさんからShellの変更方法について、指摘がありましたので、viで「/etc/passwd」を開いて直接変更する方法から、’usermod -s’のコマンドを使用して変更する方法に変更しました。
Twitter:
Warning: Undefined array key "Twitter" in /home/sazaeau/mizoshiri.com/public_html/blog.mizoshiri.com/wp-content/plugins/sns-count-cache/sns-count-cache.php on line 2897
0 | Facebook: 0 | Google Plus:
Warning: Undefined array key "Google+" in /home/sazaeau/mizoshiri.com/public_html/blog.mizoshiri.com/wp-content/plugins/sns-count-cache/sns-count-cache.php on line 2897
0 | Hatena: 5 | Pocket: 5 | Total: 10 | Feedly: 0
pearが入っているのかを確認する
|
1 2 3 4 5 6 7 8 9 10 11 12 13 14 15 16 |
yum list | grep pear php-pear.noarch 1:1.4.9-4.el5.1 installed php-pear-Auth-SASL.noarch 1.0.2-4.el5.centos extras php-pear-DB.noarch 1.7.13-1.el5.centos extras php-pear-Date.noarch 1.4.7-2.el5.centos extras php-pear-File.noarch 1.2.2-1.el5.centos extras php-pear-HTTP-Request.noarch 1.4.2-1.el5.centos extras php-pear-Log.noarch 1.9.13-1.el5.centos extras php-pear-MDB2.noarch 2.4.1-2.el5.centos extras php-pear-MDB2-Driver-mysql.noarch 1.4.1-3.el5.centos extras php-pear-Mail.noarch 1.1.14-1.el5.centos extras php-pear-Mail-Mime.noarch 1.4.0-1.el5.centos extras php-pear-Net-SMTP.noarch 1.2.10-1.el5.centos extras php-pear-Net-Sieve.noarch 1.1.5-2.el5.centos extras php-pear-Net-Socket.noarch 1.0.8-1.el5.centos extras php-pear-Net-URL.noarch 1.0.15-1.el5.centos extras |
上記のようにpearの一覧がでればインストールはされています。
入っていない場合は、インストールが必要です。
|
1 |
yum install pear |
1.40以降でないと動かないので、pearのアップグレード
|
1 |
pear upgrade PEAR |
symfonyにチャンネルを追加
|
1 |
pear channel-discover pear.symfony-project.com |
いよいよsymfonyをインストール
|
1 2 |
pear install symfony/symfony<br> symfony/symfony requires PHP extension "dom" |
とエラーがでる、、、調べると「php-xml」が必要らしい
|
1 |
yum install php-xml |
symfonyのインストールを再挑戦
|
1 2 3 4 5 |
pear install symfony/symfony downloading symfony-1.1.1.tgz ... Starting to download symfony-1.1.1.tgz (2,131,490 bytes) ..................................................done: 2,131,490 bytes install ok: channel://pear.symfony-project.com/symfony-1.1.1 |
インストールの確認
|
1 2 3 4 5 6 7 8 9 10 11 12 13 14 15 16 17 18 19 20 21 22 23 24 25 26 27 28 29 30 31 32 33 34 35 36 37 38 39 40 41 42 43 44 45 46 47 48 49 50 51 52 53 54 |
symfony -v<br> Available tasks: :help Displays help for a task (h) :list Lists tasks cache :clear Clears the cache (cc, clear-cache) configure :author Configure project author :database Configure database DSN generate :app Generates a new application (init-app) :module Generates a new module (init-module) :project Generates a new project (init-project) :task Creates a skeleton class for a new task i18n :extract Extracts i18n strings from php files :find Finds non "i18n ready" strings in an application log :clear Clears log files (log-purge) :rotate Rotates an application log files (log-rotate) plugin :add-channel Add a new PEAR channel :install Installs a plugin (plugin-install) :list Lists installed plugins (plugin-list) :uninstall Uninstalls a plugin (plugin-uninstall) :upgrade Upgrades a plugin (plugin-upgrade) project :clear-controllers Clears all non production environment controllers (clear-controllers) :deploy Deploys a project to another server (sync) :disable Disables an application in a given environment (disable) :enable Enables an application in a given environment (enable) :freeze Freezes symfony libraries (freeze) :permissions Fixes symfony directory permissions (permissions, fix-perms) :unfreeze Unfreezes symfony libraries (unfreeze) :upgrade1.1 Upgrade a symfony project to the 1.1 symfony release propel :build-all Generates Propel model, SQL and initializes the database (propel-build-all) :build-all-load Generates Propel model, SQL, initializes database, and load data (propel-build-all-load) :build-db Creates database for current model (propel-build-db) :build-forms Creates form classes for the current model :build-model Creates classes for the current model (propel-build-model) :build-schema Creates a schema.xml from an existing database (propel-build-schema) :build-sql Creates SQL for the current model (propel-build-sql) :data-dump Dumps data to the fixtures directory (propel-dump-data) :data-load Loads data from fixtures directory (propel-load-data) :generate-crud Generates a Propel CRUD module (propel-generate-crud) :init-admin Initializes a Propel admin module (propel-init-admin) :insert-sql Inserts SQL for current model (propel-insert-sql) :schema-to-xml Creates schema.xml from schema.yml (propel-convert-yml-schema) :schema-to-yml Creates schema.yml from schema.xml (propel-convert-xml-schema) test :all Launches all tests (test-all) :functional Launches functional tests (test-functional) :unit Launches unit tests (test-unit) |
とりあえず、完了!!
Twitter:
Warning: Undefined array key "Twitter" in /home/sazaeau/mizoshiri.com/public_html/blog.mizoshiri.com/wp-content/plugins/sns-count-cache/sns-count-cache.php on line 2897
0 | Facebook: 0 | Google Plus:
Warning: Undefined array key "Google+" in /home/sazaeau/mizoshiri.com/public_html/blog.mizoshiri.com/wp-content/plugins/sns-count-cache/sns-count-cache.php on line 2897
0 | Hatena: 9 | Pocket: 1 | Total: 10 | Feedly: 0
Sorry. No data so far.