AD:
ついにDrupal8が正式にリリースされました。2011年の3月から開発がはじまって、約4年の歳月を経てやっとリリースされました。
Drupal 8の特設サイト
なにが変わったのか
Drupal Campや、個人的に少し触っただけですが、だいぶ変わりました。
ボクが一番気にいっているのは、他のフレームワークと同じでオブジェクト指向の設計になっているので、MVCで設計されたPHPのフレームワークを使ったことがあれば理解しやすくなったと思います。Drupal7は習得するのにかなりの学習が必要ですが、Drupal8はその点は楽になるので、かなり楽しみにです。
各種メジャー?なライブラリが追加されました。(Twigはメジャーなのかな)
組み込まれたライブラリのめじゃーどころはこんな感じでしょうか。
ライブラリ管理ツールに
– Composer
HTTP Clientに
– Guzzle
ORM(RailsでいうところのActiveRecord)のツールに
– Symfony2
Viewのテンプレートエンジンに
– Twig
WYSIWYGエディタに
– Ckeditor
Testツールに
– PHPUnit
現場ではいつから使えるのか
これが一番きになるところですが、まだ時期尚早みたいことは回りで言っていますね。
標準で十分使えるのですが、まだPluginsの充実率も低いですが、情報がすくないからだと思います。
でも、言っていてもはじまらないので小規模な案件や、故人の案件では使って行ってもいいかと思っております。
Drupal歴が浅いボクにとっては、Drupal7を理解するよりもDrupal8に学習する時間を当てたいところです。
これからもDrupalの動きが楽しみにです。
Twitter:
Warning: Undefined array key "Twitter" in /home/sazaeau/mizoshiri.com/public_html/blog.mizoshiri.com/wp-content/plugins/sns-count-cache/sns-count-cache.php on line 2897
0 | Facebook: 0 | Google Plus:
Warning: Undefined array key "Google+" in /home/sazaeau/mizoshiri.com/public_html/blog.mizoshiri.com/wp-content/plugins/sns-count-cache/sns-count-cache.php on line 2897
0 | Hatena: 1 | Pocket: 0 | Total: 1 | Feedly: 0
AD:
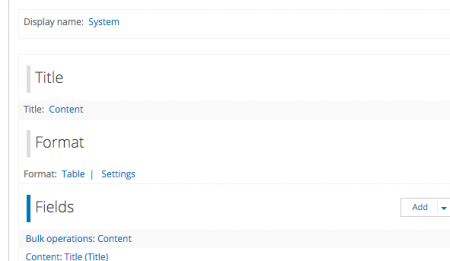
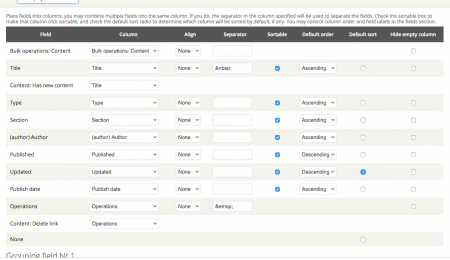
こんな感じでViewのTable ViewにSortを付けたかったのですが、地味に悩んだのでメモしておきます

Format のSettingsをClickします。
SortableをCheckしたらSort可能になります。
Twitter:
Warning: Undefined array key "Twitter" in /home/sazaeau/mizoshiri.com/public_html/blog.mizoshiri.com/wp-content/plugins/sns-count-cache/sns-count-cache.php on line 2897
0 | Facebook: 0 | Google Plus:
Warning: Undefined array key "Google+" in /home/sazaeau/mizoshiri.com/public_html/blog.mizoshiri.com/wp-content/plugins/sns-count-cache/sns-count-cache.php on line 2897
0 | Hatena: 0 | Pocket: 0 | Total: 0 | Feedly: 0
AD:
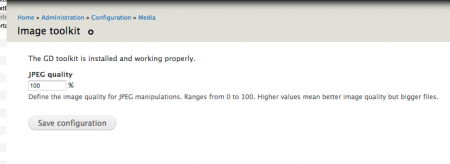
クライアントからDrupalの画像のクオリティが悪いと言われて調べるとデフォルトだとCompressがかかっていることが判明。
URL:/admin/config/media/image-toolkit
Twitter:
Warning: Undefined array key "Twitter" in /home/sazaeau/mizoshiri.com/public_html/blog.mizoshiri.com/wp-content/plugins/sns-count-cache/sns-count-cache.php on line 2897
0 | Facebook: 0 | Google Plus:
Warning: Undefined array key "Google+" in /home/sazaeau/mizoshiri.com/public_html/blog.mizoshiri.com/wp-content/plugins/sns-count-cache/sns-count-cache.php on line 2897
0 | Hatena: 1 | Pocket: 0 | Total: 1 | Feedly: 0
AD:
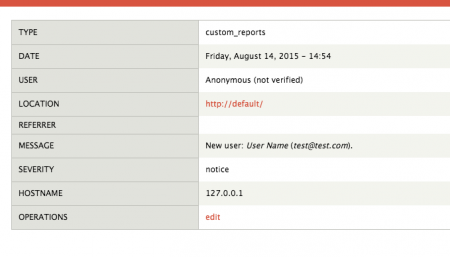
たとえば、ユーザが追加された際などにWatchDogでログを残しておく場合
|
|
watchdog('custom_reports', // Typeを指定 'New user: %name (%email).', //メッセージ array( '%name' => $form_state['values']['name'], //メッセージにデータを渡す '%email' => $form_state['values']['mail'] //メッセージにデータを渡す ), WATCHDOG_NOTICE, l(t('edit'), 'user/'. $account->uid .'/edit') // 実行された場所をしていできる ); |
結果はこんな感じ
確認ページはこちら
/admin/reports/dblog

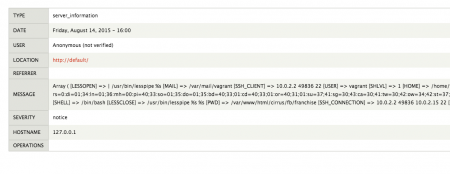
変数の内容をWatchdogにのこしておきたい場合
|
|
watchdog('server_information', print_r($_SERVER, TRUE)); |
結果はこんな感じ
実際のFunctionはこんな感じです。
https://api.drupal.org/api/drupal/includes%21bootstrap.inc/function/watchdog/7
1 2 3 4 5 6 7 8 9 10 11 12 13 14 15 16 17 18 19 20 21 22 23 24 25 26 27 28 29 30 31 32 33 34 35 36 37 38 39 |
function watchdog($type, $message, $variables = array(), $severity = WATCHDOG_NOTICE, $link = NULL) { global $user, $base_root; static $in_error_state = FALSE; // It is possible that the error handling will itself trigger an error. In that case, we could // end up in an infinite loop. To avoid that, we implement a simple static semaphore. if (!$in_error_state && function_exists('module_implements')) { $in_error_state = TRUE; // The user object may not exist in all conditions, so 0 is substituted if needed. $user_uid = isset($user->uid) ? $user->uid : 0; // Prepare the fields to be logged $log_entry = array( 'type' => $type, 'message' => $message, 'variables' => $variables, 'severity' => $severity, 'link' => $link, 'user' => $user, 'uid' => $user_uid, 'request_uri' => $base_root . request_uri(), 'referer' => isset($_SERVER ['HTTP_REFERER']) ? $_SERVER ['HTTP_REFERER'] : '', 'ip' => ip_address(), // Request time isn't accurate for long processes, use time() instead. 'timestamp' => time(), ); // Call the logging hooks to log/process the message foreach (module_implements('watchdog') as $module) { module_invoke($module, 'watchdog', $log_entry); } // It is critical that the semaphore is only cleared here, in the parent // watchdog() call (not outside the loop), to prevent recursive execution. $in_error_state = FALSE; } } |
Twitter:
Warning: Undefined array key "Twitter" in /home/sazaeau/mizoshiri.com/public_html/blog.mizoshiri.com/wp-content/plugins/sns-count-cache/sns-count-cache.php on line 2897
0 | Facebook: 0 | Google Plus:
Warning: Undefined array key "Google+" in /home/sazaeau/mizoshiri.com/public_html/blog.mizoshiri.com/wp-content/plugins/sns-count-cache/sns-count-cache.php on line 2897
0 | Hatena: 0 | Pocket: 1 | Total: 1 | Feedly: 0
AD:
nodeテーブルからtypeをWhereに入れてSELECT
1 2 3 4 5 6 7 8 9 10 11 12 13 14 15 16 17 18 19 20 21 22 23 24 25 26 27 28 29 |
//nidだけを知りたいだけ $results = db_select('node', 'n') ->fields('n', array('nid')) ->condition('type', 'article') ->execute() ->fetchCol(); //複数のfieldsがほしいなら $results = db_select('node', 'n') ->fields('n', array('nid', 'title')) ->condition('type', 'article') ->execute(); foreach($results as $row){ var_dump($row); } //countなら $results = db_select('node', 'n') ->fields('n', array('nid', 'title')) ->condition('type', 'article') ->execute() ->rowCount(); //queryを確認したいなら $results = db_select('node', 'n') ->fields('n', array('nid', 'title')) ->condition('type', 'article') ->execute() ->getQueryString(); |
field_data_field_package_periodテーブルから日付をWhereに入れてSELECT
|
|
$date = new DateTime(); $results = db_select('field_data_field_package_period', 'fpp') ->fields('fpp', array('field_package_period_value2')) ->condition('field_package_period_value2', $date->format('Y-m-d H:i:s'), '<') ->execute() ->fetchCol(); |
field_data_field_package_periodテーブルからentity_idをINでSELECT
$results = db_select('field_data_field_package_level', 'fpl')

  ->fields('fpl', array('field_package_level_value'))

  ->condition('entity_id', array(1,2,3), 'IN')

  ->condition('field_package_level_value', 0, '!=')

  ->execute()

			Twitter:

Warning:  Undefined array key "Twitter" in /home/sazaeau/mizoshiri.com/public_html/blog.mizoshiri.com/wp-content/plugins/sns-count-cache/sns-count-cache.php on line 2897

0 | Facebook: 0 | Google Plus:

Warning:  Undefined array key "Google+" in /home/sazaeau/mizoshiri.com/public_html/blog.mizoshiri.com/wp-content/plugins/sns-count-cache/sns-count-cache.php on line 2897

0			| Hatena: 0 | Pocket: 0 | Total: 0 | Feedly: 0
AD:
1 2 3 4 5 6 7 8 9 10 11 12 13 14 15 16 17 18 19 20 21 22 23 24 25 26 27 28 29 30 31 |
<?php function your_module_name_form_submit($form, &$form_state['values']) { drupal_mail ( // The name of your module[ 'you_need_matach_the_name_here', 'notice', 'メールアドレス', //送りたいメールアドレス 'jp',//言語 // 渡したいパラメーター arrray ( 'some_value' => $form_state['values']['some_value'], // Pass some submitted value to hook_mail ) ); } function you_need_matach_the_name_here_mail($key, &$message, $params) { if($key == 'notice') { $message['subject'] = t('Email from @site_name', array('@site_name' => variable_get('site_name', 'The site'))); $message['body'][] = t('Hello'); $message['body'][] = ''; //改行 $message['body'][] = t('フォームでサブミットされた内容はここ @value', array('@value' => $params['some_value'])); $message['body'][] = ''; //改行 $message['body'][] = t('Thanks, @the_site', array('@site_name' => variable_get('site_name', 'The site'))); } } ?> |
Twitter:
Warning: Undefined array key "Twitter" in /home/sazaeau/mizoshiri.com/public_html/blog.mizoshiri.com/wp-content/plugins/sns-count-cache/sns-count-cache.php on line 2897
0 | Facebook: 0 | Google Plus:
Warning: Undefined array key "Google+" in /home/sazaeau/mizoshiri.com/public_html/blog.mizoshiri.com/wp-content/plugins/sns-count-cache/sns-count-cache.php on line 2897
0 | Hatena: 0 | Pocket: 0 | Total: 0 | Feedly: 0
AD:
Productの価格を取得したくて、最終的にこのような形で取得することができました。
|
|
$order_wrapper = entity_metadata_wrapper('commerce_order', $order); $order_id = $order->order_id; $line_items = $order_wrapper->commerce_line_items; foreach ($line_items as $line_item) { if (!$line_item instanceof EntityMetadataWrapper) { $line_item = entity_metadata_wrapper('commerce_line_item', $line_item); } $product_detail = commerce_product_load_by_sku($line_item->line_item_label->value()); var_dump(product_detail); } |
Twitter:
Warning: Undefined array key "Twitter" in /home/sazaeau/mizoshiri.com/public_html/blog.mizoshiri.com/wp-content/plugins/sns-count-cache/sns-count-cache.php on line 2897
0 | Facebook: 0 | Google Plus:
Warning: Undefined array key "Google+" in /home/sazaeau/mizoshiri.com/public_html/blog.mizoshiri.com/wp-content/plugins/sns-count-cache/sns-count-cache.php on line 2897
0 | Hatena: 0 | Pocket: 0 | Total: 0 | Feedly: 0
AD:
|
|
<?php global $user; $quantity = 0; $order = commerce_cart_order_load($user->uid); if ($order) { $wrapper = entity_metadata_wrapper('commerce_order', $order); $line_items = $wrapper->commerce_line_items; $quantity = commerce_line_items_quantity($line_items, commerce_product_line_item_types()); //これが購入数です。 $total = commerce_line_items_total($line_items); $currency = commerce_currency_load($total['currency_code']); } |
ユーザでなくて、変数$orderはDrupal Commerceの中でかなり使いまわします。
$order変数さえあれば、数量(quantity)は習得できるようになります。
参考にさせていただいたサイト
Programmatically show number of items in Drupal Commerce shopping cart
Twitter:
Warning: Undefined array key "Twitter" in /home/sazaeau/mizoshiri.com/public_html/blog.mizoshiri.com/wp-content/plugins/sns-count-cache/sns-count-cache.php on line 2897
0 | Facebook: 0 | Google Plus:
Warning: Undefined array key "Google+" in /home/sazaeau/mizoshiri.com/public_html/blog.mizoshiri.com/wp-content/plugins/sns-count-cache/sns-count-cache.php on line 2897
0 | Hatena: 0 | Pocket: 0 | Total: 0 | Feedly: 0
AD:
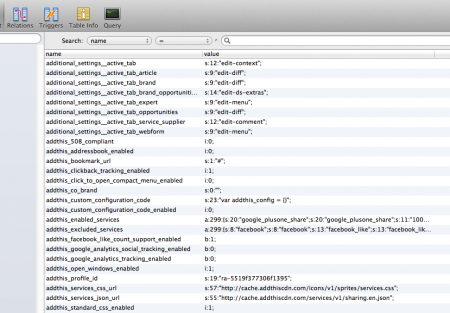
Drupalのvariable_set()や、variable_get()で使用しているデータはvariableに保存されています。
Twitter:
Warning: Undefined array key "Twitter" in /home/sazaeau/mizoshiri.com/public_html/blog.mizoshiri.com/wp-content/plugins/sns-count-cache/sns-count-cache.php on line 2897
0 | Facebook: 0 | Google Plus:
Warning: Undefined array key "Google+" in /home/sazaeau/mizoshiri.com/public_html/blog.mizoshiri.com/wp-content/plugins/sns-count-cache/sns-count-cache.php on line 2897
0 | Hatena: 0 | Pocket: 0 | Total: 0 | Feedly: 0
AD:
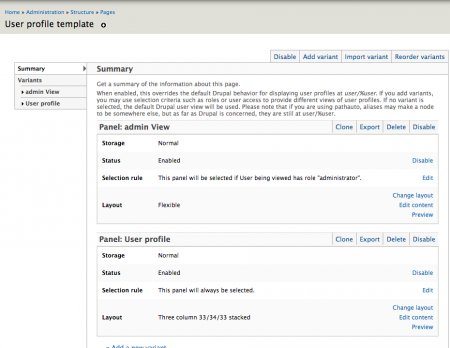
Panelsモジュールは、テンプレートなどをいじることなく、URLやコンテンツによってデザインを変更できるようになります。
使い方が難しいので覚書しておきます。
モジュールの有効化
Drushで一撃で有効化します。
その後、各種ページでPanelsを使いたいばあいはPage Managerも有効にしておきます。

ユーザにページをRoleによってデザインを変更したい場合
Panelの参考として、ユーザのプロフィールページをRoleによってデザインを変更したい場合を紹介します。
1./admin/structure/panelsからUser profile templateをEditします。
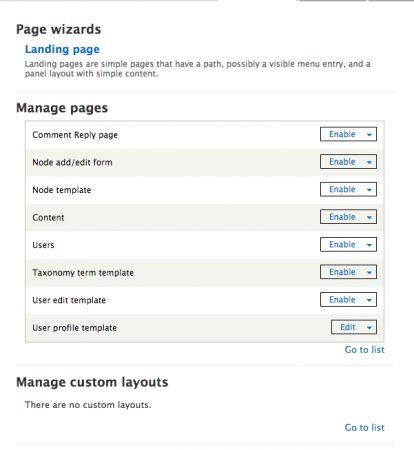
2.Add variantでVariantを追加します。
はじめにデフォルトなるもの(条件にひかからないもの)を追加しておきます。
Title: User profile defaultとにでもしておきます。
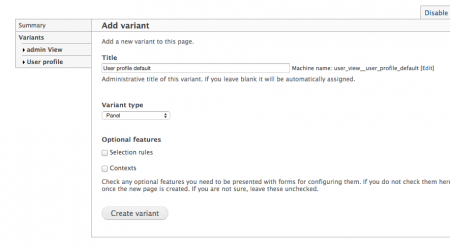
3.Layoutを選びます。
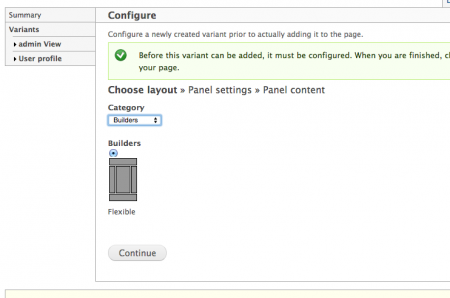
4.各種CSSなどの設定をいれます。
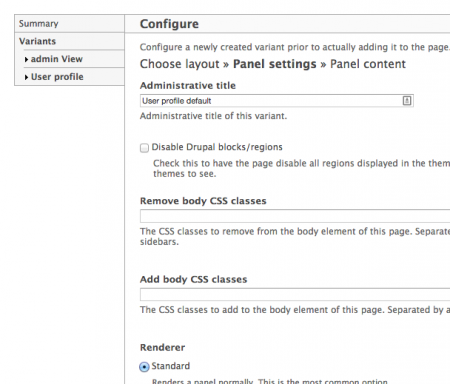
ここでこいつにCheckいれるとサイドバーなどのBlockが消えます。

5. 選択レイアウトになにを表示したいか設定します。
表示したい内容を選択して保存します。
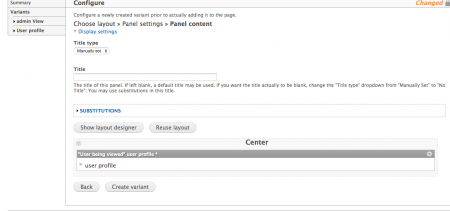
とりあえず、これでデフォルトに表示されるものは同じです。
次に、Adminユーザの場合のルールを追加してデザインを変更したいと思います。
1. Add variantで追加
追加する際に、Selection rulesを選択して追加してください。
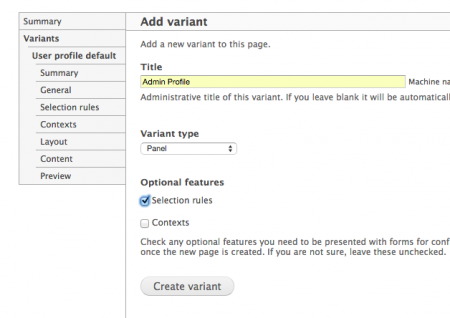
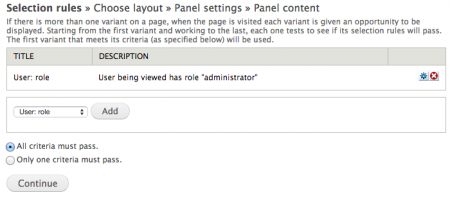
2. Ruleを追加します。
RoleがAdminの場合というRuleを追加します。
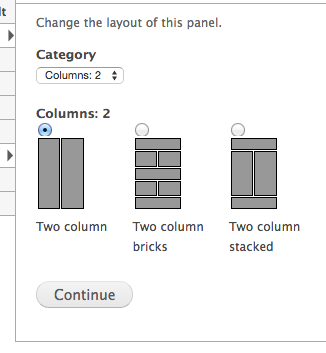
3. Adminの時はLayoutを2カラムに変更します。
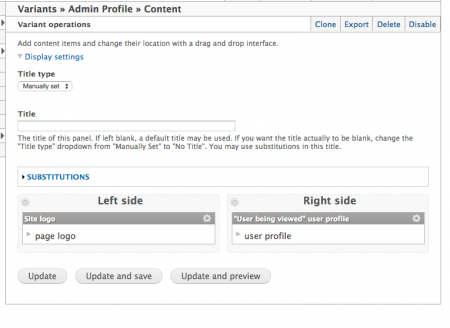
4. Profileの横にサイトのロゴを表示させます。
コンテンツを選んで保存します。
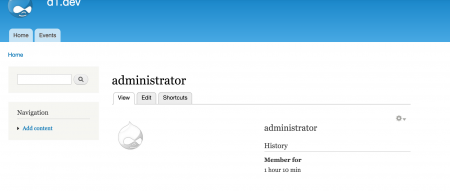
Adminユーザの時だけ、サイトロゴがサイドに表示されるようになりました。
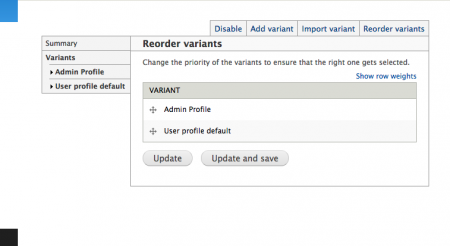
注意
Variantは上から適応されるので、Weightの並びに気をつけてください。
Twitter:
Warning: Undefined array key "Twitter" in /home/sazaeau/mizoshiri.com/public_html/blog.mizoshiri.com/wp-content/plugins/sns-count-cache/sns-count-cache.php on line 2897
0 | Facebook: 0 | Google Plus:
Warning: Undefined array key "Google+" in /home/sazaeau/mizoshiri.com/public_html/blog.mizoshiri.com/wp-content/plugins/sns-count-cache/sns-count-cache.php on line 2897
0 | Hatena: 2 | Pocket: 2 | Total: 4 | Feedly: 0


