It is good song!!! I love it.
Jun 1, 2009Barry Manilow Can’t Smile Without You
Twitter: 0 | Facebook: 0 | Google Plus: 0 | Hatena: 0 | Pocket: 0 | Total: 0 | Feedly: 0
Twitter: 0 | Facebook: 0 | Google Plus: 0 | Hatena: 0 | Pocket: 0 | Total: 0 | Feedly: 0
オーストラリアのワーキングホリデービザを自分で取得する方法 その1の続きです。
はじめに
オーストラリアのワーキングホリデーを取得しないといけなくなったので、なかなかできない体験なのでせっかくなので、blogにメモとして残しておこうとおもいました。
2009/05/23に行ったVisaの申請方法のメモなので、あまり鵜呑みにしないで自分でもしっかりと調べてください。
移民局・オーストラリアの政府によって、ビザ申請方法や、条件、費用などは、変わる場合がありますので、ご注意ください。
Visaの内容を確認しているか、聞いているので内容を理解している人は、「I have read and agree to the terms and conditions」を押して次の画面に行ってください。

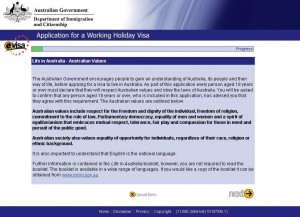
オーストラリア政府より、オーストラリアライフについての説明です。
内容を確認してから、「NEXT」を押してください。
| Family name | 苗字 |
|---|---|
| Given names | 名前 |
| SEX | 性別 Female:男 Male:女 |
| Date of birth | 日/月/年 |
| Marital status | 配偶者の有無 Divorced:離婚 Engaged:婚約中 De Facto:婚姻状態 Married:既婚 Never Married:未婚 Separated:別居 Widowed:死別 |
| Town/City | 出生地 |
|---|---|
| Country | 出生国 |
| Country of residence | 国籍 |
|---|
| Passport number | パスポートナンバー |
|---|---|
| Country of passport | パスポートの発行した国 |
| Nationality of passport holder | 国籍 |
| Passport date of issue | パスポートの発効日 |
| Passport date of expiry | パスポートの有効期限日 |
| Passport place of issue / issuing authority | パスポートの発行機関 |
上記の内容を入力して、「NEXT」を押してください。
Twitter:
Warning: Undefined array key "Twitter" in /home/sazaeau/mizoshiri.com/public_html/blog.mizoshiri.com/wp-content/plugins/sns-count-cache/sns-count-cache.php on line 2897
0 | Facebook: 0 | Google Plus:
Warning: Undefined array key "Google+" in /home/sazaeau/mizoshiri.com/public_html/blog.mizoshiri.com/wp-content/plugins/sns-count-cache/sns-count-cache.php on line 2897
0 | Hatena: 0 | Pocket: 0 | Total: 0 | Feedly: 0
At the opera house, on July 26 I will go to see the Michael Nynam concert.
I booked these thickets!!!
Im looking fwd to listening to this music!!! It is sad sound but it is beautiful.
Twitter:
Warning: Undefined array key "Twitter" in /home/sazaeau/mizoshiri.com/public_html/blog.mizoshiri.com/wp-content/plugins/sns-count-cache/sns-count-cache.php on line 2897
0 | Facebook: 0 | Google Plus:
Warning: Undefined array key "Google+" in /home/sazaeau/mizoshiri.com/public_html/blog.mizoshiri.com/wp-content/plugins/sns-count-cache/sns-count-cache.php on line 2897
0 | Hatena: 0 | Pocket: 0 | Total: 0 | Feedly: 0
オーストラリアのワーキングホリデーを取得しないといけなくなったので、なかなかできない体験なのでせっかくなので、blogにメモとして残しておこうとおもいました。
2009/05/23に行ったVisaの申請方法のメモなので、あまり鵜呑みにしないで自分でもしっかりと調べてください。
移民局・オーストラリアの政府によって、ビザ申請方法や、条件、費用などは、変わる場合がありますので、ご注意ください。
まず、ワーキングビザをよく理解することから、はじめましょう。
オースラリア政府が運営するサイトのワーキングビザについて熟読してください。
特に条件や、就労期間の制限なども確認しておいてください。
ビザ申請フォームからビザを申請します、いくつかビザの種類があるので「eWH (ワーキングホリデービザ)」を選択してください。
※有効なクレジットカードと残存期限が6ヶ月以上あるパスポートが必要になってきます。
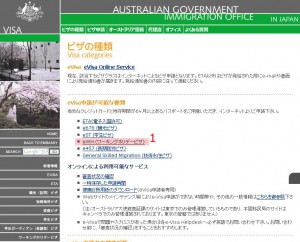
オーストラリア移民局のサイトから、ワーキングホリデービザの種類を選んで申請を行っていきます。
ぼくの場合は、はじめのワーキングホリデービザの申請だったので、「First Working Holiday visa」を選択しました。
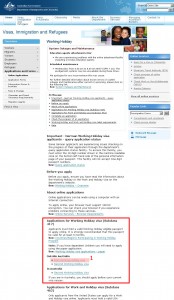
申請画面の仕様などや、メンテンアスなどが明記してあるので、一通り目を通しておいてください。
確認できたら、「Start your application」を選択してください。

Twitter:
Warning: Undefined array key "Twitter" in /home/sazaeau/mizoshiri.com/public_html/blog.mizoshiri.com/wp-content/plugins/sns-count-cache/sns-count-cache.php on line 2897
0 | Facebook: 0 | Google Plus:
Warning: Undefined array key "Google+" in /home/sazaeau/mizoshiri.com/public_html/blog.mizoshiri.com/wp-content/plugins/sns-count-cache/sns-count-cache.php on line 2897
0 | Hatena: 0 | Pocket: 0 | Total: 0 | Feedly: 0
|
1 2 3 4 5 6 7 8 9 10 11 12 13 14 15 16 17 |
" フォント設定: if has('win32') " Windows用 set guifont=MS_Gothic:h10:cSHIFTJIS ← h12だったものを、h10に変更 "set guifont=MS_Mincho:h12:cSHIFTJIS " 行間隔の設定 set linespace=1 " 一部のUCS文字の幅を自動計測して決める if has('kaoriya') set ambiwidth=auto endif elseif has('mac') set guifont=Osaka−等幅:h14 elseif has('xfontset') " UNIX用 (xfontsetを使用) set guifontset=a14,r14,k14 endif |
|
1 2 3 4 |
"タブの表示設定 :set ts=2 sw=2 sts=0 "記号で表示 :set list |
追記
ついでに、下記の内容も追加
|
1 2 3 4 |
"バックファイルをつくらない :set nobackup "行数を表示させる :set number |
Twitter:
Warning: Undefined array key "Twitter" in /home/sazaeau/mizoshiri.com/public_html/blog.mizoshiri.com/wp-content/plugins/sns-count-cache/sns-count-cache.php on line 2897
0 | Facebook: 0 | Google Plus:
Warning: Undefined array key "Google+" in /home/sazaeau/mizoshiri.com/public_html/blog.mizoshiri.com/wp-content/plugins/sns-count-cache/sns-count-cache.php on line 2897
0 | Hatena: 6 | Pocket: 5 | Total: 11 | Feedly: 0
ついに、vimに手を出してしまいました。
とりあえず、windows環境にダウンロードして、設定してみます。
まずgvimをダウンロートします。
KaoriYa.netから最新のgvimをダウンロードしてきます。
ダウンロ−ドした、ディレクトリを適当な場所に保存します。
次に、辞書をhttp://www.vim.org/からダウンロードしてきます。
今回は、PHPの補完なので、PHPの辞書を使用します。
vimのディレクトリの中に、「dictionary」という名のフォルダを作成して、PHP用の辞書「php.dict」を保存しておきます。
次に、vimのディレクトリの中にあるgvimrcに下記の記述を追加します。
|
1 2 3 4 |
"PHPの辞書 補完 20090520 :set dictionary=dictionary/php.dict "拡張子で、分岐するように設定しておく、今回はPHPのみの設定なのであまり関係ないが記述しておく。 autocmd FileType php :set dictionary=dictionary/PHP.dict |
これで、設定は終了です。
スクリプトを入力をして、「CTRL+X」を押して、「CTRL+K」で補完のリストが表示されます。
Twitter:
Warning: Undefined array key "Twitter" in /home/sazaeau/mizoshiri.com/public_html/blog.mizoshiri.com/wp-content/plugins/sns-count-cache/sns-count-cache.php on line 2897
0 | Facebook: 0 | Google Plus:
Warning: Undefined array key "Google+" in /home/sazaeau/mizoshiri.com/public_html/blog.mizoshiri.com/wp-content/plugins/sns-count-cache/sns-count-cache.php on line 2897
0 | Hatena: 13 | Pocket: 1 | Total: 15 | Feedly: 0
Recently I set these setting for apache server.

|
1 2 3 4 5 6 7 8 9 10 11 12 13 |
<virtualhost *:80> ServerName hoge.com ServerAlias www.hoge.com DocumentRoot "/home/hoge/hoge.com/www/" php_admin_value open_basedir "/home/hoge/hoge.com/www//:/tmp/" < Directory ~ "/..+/"> Order Deny,Allow Deny from All </Directory> < Directory "/home/hoge/public/www/"> Options All AllowOverride All </Directory> |
It can set access by user directory.
It can’t access .filename by Http.It is like .svn.
Twitter:
Warning: Undefined array key "Twitter" in /home/sazaeau/mizoshiri.com/public_html/blog.mizoshiri.com/wp-content/plugins/sns-count-cache/sns-count-cache.php on line 2897
0 | Facebook: 0 | Google Plus:
Warning: Undefined array key "Google+" in /home/sazaeau/mizoshiri.com/public_html/blog.mizoshiri.com/wp-content/plugins/sns-count-cache/sns-count-cache.php on line 2897
0 | Hatena: 0 | Pocket: 0 | Total: 0 | Feedly: 0
常駐させているアプリのアイコンが表示されている「Windowsのインジケータ」にteraturmが表示されなくなったので
対処法を調べたので、メモとして残しておきます。
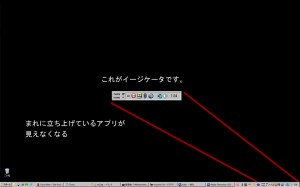
[マイネットワーク]のプロパティから[詳細設定]→[オプションネットワークコンポーネント]→[ネットワークサービス]をクリックして[詳細]へ
□UPnPユーザーインターフェイスにチェックが入っていたら、消しておく。
これで再起動後、表示されるようになります。
Twitter: 0 | Facebook: 0 | Google Plus: 0 | Hatena: 0 | Pocket: 0 | Total: 0 | Feedly: 0
What logs does your Postgres dump?
I set these setting on postgresql.conf
|
1 2 3 4 |
#The default is NOTICE. log_min_error_statement = WARNING #I set ten seconds. log_min_duration_statement = 10000 |
Controls whether or not the SQL statement that causes an error condition will be recorded in the server log.
Causes the duration of each completed statement to be logged if the statement ran for at least the specified number of milliseconds.
Twitter: 0 | Facebook: 0 | Google Plus: 0 | Hatena: 0 | Pocket: 0 | Total: 0 | Feedly: 0
I often use postgres server,so sometimes I have to make testing environment for postgres in my windows pc.
So I want to write how to make testing environment about Postgres for my memo.
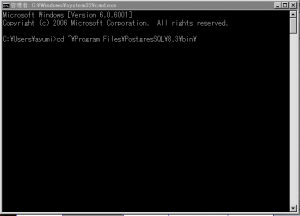
Please login postgres server, and then you have to change user what this user is postgres user.
And I use pg_dump.
|
1 |
# pg_dump -f filename.sql.gz -Z 1 -c database-name |
-f to write file about output.
-Z。。Number this is level of compression.
-c it is cleaning for schema.
You get dump file from server.And then you decompress file.
You install postgres in your windows PC. Please check Postgres sites.
Please copy dump file to there.
|
1 |
Program FilesPostgresSQL8.3bin |
|
1 2 3 4 5 6 7 8 9 10 11 |
cd Program FilesPostgresSQL8.3bin psql dbname That's all!!! And if you see these message.Please make user on for postgres. psql: FATAL: role "・譯シ・カフセ" does not exist、ネクタ、??ソ、饅r Or please change user what this user is postgres user. <pre>psql -u |
Twitter: 0 | Facebook: 0 | Google Plus: 0 | Hatena: 0 | Pocket: 0 | Total: 0 | Feedly: 0
Sorry. No data so far.