AD:
MacのHomebrew自体のバージョンを上げようと思いupdateするとエラーでできませんでした。
|
|
$ sudo brew update Error: Failure while executing: git pull -q origin refs/heads/master:refs/remotes/origin/master |
解決方法
brewさん自体がすでに更新されている状態なので、updateするとpullしようとするとぶつかってしまうのが問題のようです。
なので、git fetchで最新を落として、resetでインデックス、ワーキングツリーをすべて変更しています。
|
|
$ cd /usr/local $ git fetch origin $ git reset --hard origin/master |
参考ページ
Twitter:
Warning: Undefined array key "Twitter" in /home/sazaeau/mizoshiri.com/public_html/blog.mizoshiri.com/wp-content/plugins/sns-count-cache/sns-count-cache.php on line 2897
0 | Facebook: 0 | Google Plus:
Warning: Undefined array key "Google+" in /home/sazaeau/mizoshiri.com/public_html/blog.mizoshiri.com/wp-content/plugins/sns-count-cache/sns-count-cache.php on line 2897
0 | Hatena: 0 | Pocket: 0 | Total: 0 | Feedly: 0
AD:
Apple AirのOSをMavericksに変更したら下記のエラーになって立ち上がらなくなりました。。。
|
|
% vagrant up [default] VM already created. Booting if it's not already running... [default] Clearing any previously set forwarded ports... [default] Forwarding ports... [default] -- 22 => 2222 (adapter 1) [default] Creating shared folders metadata... [default] Clearing any previously set network interfaces... There was an error executing the following command with VBoxManage: ["hostonlyif", "create"] For more information on the failure, enable detailed logging with VAGRANT_LOG. |
臨時の解決方法
VirtualBoxのNetworkの設定が問題だと思うのですが、Mavericksに変更後に優先順位的なものが変更したのかと。。。
とりあえずVirtualBoxを再起動で立ち上がるようにはなりましたが、根本的な開発調査中
|
|
% sudo /Library/StartupItems/VirtualBox/VirtualBox restart |
Twitter:
Warning: Undefined array key "Twitter" in /home/sazaeau/mizoshiri.com/public_html/blog.mizoshiri.com/wp-content/plugins/sns-count-cache/sns-count-cache.php on line 2897
0 | Facebook: 0 | Google Plus:
Warning: Undefined array key "Google+" in /home/sazaeau/mizoshiri.com/public_html/blog.mizoshiri.com/wp-content/plugins/sns-count-cache/sns-count-cache.php on line 2897
0 | Hatena: 0 | Pocket: 1 | Total: 1 | Feedly: 0
AD:
Design
Fonts 12pt Monaco
Window > Transparency around 20%
In iTerm2, in Preferences -> Profiles -> Terminal, under “Terminal Emulation” you have “Report Terminal Type:” set to xterm-256color.
ShortCut
|
|
Shift + Mac + t = move tab Mac + t = change tab |
Twitter:
Warning: Undefined array key "Twitter" in /home/sazaeau/mizoshiri.com/public_html/blog.mizoshiri.com/wp-content/plugins/sns-count-cache/sns-count-cache.php on line 2897
0 | Facebook: 0 | Google Plus:
Warning: Undefined array key "Google+" in /home/sazaeau/mizoshiri.com/public_html/blog.mizoshiri.com/wp-content/plugins/sns-count-cache/sns-count-cache.php on line 2897
0 | Hatena: 0 | Pocket: 0 | Total: 0 | Feedly: 0
AD:
Vimのメモです。
phpをVimで書いているので、その際AutoCompleteを設定しているのですが、地味に迷ったのでメモしておきます。
AutoCompleteのDL
hgはインストールしておいてください。
|
|
$ cd ~/./vim/bundle/ $ hg clone https://bitbucket.org/ns9tks/vim-autocomplpop $ hg clone https://bitbucket.org/ns9tks/vim-l9 |
.vimrcに下記を追加
|
|
$ vi ~/.vimrc "autocomplete :set omnifunc=phpcomplete#CompletePHP |
Twitter:
Warning: Undefined array key "Twitter" in /home/sazaeau/mizoshiri.com/public_html/blog.mizoshiri.com/wp-content/plugins/sns-count-cache/sns-count-cache.php on line 2897
0 | Facebook: 0 | Google Plus:
Warning: Undefined array key "Google+" in /home/sazaeau/mizoshiri.com/public_html/blog.mizoshiri.com/wp-content/plugins/sns-count-cache/sns-count-cache.php on line 2897
0 | Hatena: 0 | Pocket: 0 | Total: 0 | Feedly: 0
AD:
Vagrantを使っているのですが、shareでいろいろとトラブルがあります。。。
今回の問題
- shareフォルダのパーミッションが変更できなかったり
- apache関係が作成したcacheファイルが上書きできなくなる現象がたまに起こる
解決方法
フォルダの解決方法をNFSに変更したら解決しました。
参考にさせてもらったページ:http://vagrantup.com/docs/nfs.html
|
|
$ vi Vagrantfile config.vm.share_folder("v-root", "/vagrant", ".", :nfs => true) $ vagrant reload |
Twitter:
Warning: Undefined array key "Twitter" in /home/sazaeau/mizoshiri.com/public_html/blog.mizoshiri.com/wp-content/plugins/sns-count-cache/sns-count-cache.php on line 2897
0 | Facebook: 0 | Google Plus:
Warning: Undefined array key "Google+" in /home/sazaeau/mizoshiri.com/public_html/blog.mizoshiri.com/wp-content/plugins/sns-count-cache/sns-count-cache.php on line 2897
0 | Hatena: 0 | Pocket: 0 | Total: 0 | Feedly: 0
AD:
vagrantを立ち上げると、こんな感じなエラーでる
それで、vagrant sshで入って、/vagrant/をみると中身が空っぽ
1 2 3 4 5 6 7 8 9 10 11 12 13 14 15 16 17 18 19 |
$ vagrant up [default] VM already created. Booting if it's not already running... [default] Clearing any previously set forwarded ports... [default] Forwarding ports... [default] -- 22 => 2222 (adapter 1) [default] -- 80 => 8080 (adapter 1) [default] Creating shared folders metadata... [default] Clearing any previously set network interfaces... [default] Preparing network interfaces based on configuration... [default] Booting VM... [default] Waiting for VM to boot. This can take a few minutes. [default] VM booted and ready for use! [default] Configuring and enabling network interfaces... [default] Mounting shared folders... [default] -- v-root: /vagrant The following SSH command responded with a non-zero exit status. Vagrant assumes that this means the command failed! mount -t vboxsf -o uid=`id -u vagrant`,gid=`id -g vagrant` v-root /vagrant |
解決方法
vboxの問題のようなので、vboxをリビルドしてやる
|
|
$ vagrant ssh $ sudo /etc/init.d/vboxadd setup Removing existing VirtualBox DKMS kernel modules [ OK ] Removing existing VirtualBox non-DKMS kernel modules [ OK ] Building the VirtualBox Guest Additions kernel modules Building the main Guest Additions module [ OK ] Building the shared folder support module [ OK ] Building the OpenGL support module [FAILED] (Look at /var/log/vboxadd-install.log to find out what went wrong) Doing non-kernel setup of the Guest Additions [ OK ] |
一度落として再起動で正常にmountができるようになりました。
|
|
$ vagrant halt $ vagrant up |
Twitter:
Warning: Undefined array key "Twitter" in /home/sazaeau/mizoshiri.com/public_html/blog.mizoshiri.com/wp-content/plugins/sns-count-cache/sns-count-cache.php on line 2897
0 | Facebook: 0 | Google Plus:
Warning: Undefined array key "Google+" in /home/sazaeau/mizoshiri.com/public_html/blog.mizoshiri.com/wp-content/plugins/sns-count-cache/sns-count-cache.php on line 2897
0 | Hatena: 20 | Pocket: 7 | Total: 27 | Feedly: 0
AD:
最近Vagrantを導入したのですが、はじめのPort Forwardingでつまづきましたので、
同じ過ちをおかさないためにメモしておきます。
Centos6 をインストールしました
|
|
$ cd /Users/hoge/ $ gem install vagrant $ vagrant box add mini-cent60 http://dl.dropbox.com/u/9227672/CentOS-6.0-x86_64-netboot-4.1.6.box $ mkdir -p ./vm/test/ $ cd ./vm/test/ $ vagrant init mini-cent60 $ vagrant up |
ここまでは問題ないのですが、接続等も確認できましたが、
肝心のPort Forwardingでつまづきました。
でやったこと
Vagrantfileの設定を変更
|
|
$ vi vm/test/Vagrantfile #コメントアウトをはずす config.vm.network :hostonly, "192.168.33.10" #コメントアウトしていたものをはずすのと、ポートの前にサービス名を追加 config.vm.forward_port "httpd", 80 |
このポートの前にサービス名を入れるのがまったくわからなくてPort Forwardingがうまくいかなかったようです。
Twitter:
Warning: Undefined array key "Twitter" in /home/sazaeau/mizoshiri.com/public_html/blog.mizoshiri.com/wp-content/plugins/sns-count-cache/sns-count-cache.php on line 2897
0 | Facebook: 0 | Google Plus:
Warning: Undefined array key "Google+" in /home/sazaeau/mizoshiri.com/public_html/blog.mizoshiri.com/wp-content/plugins/sns-count-cache/sns-count-cache.php on line 2897
0 | Hatena: 4 | Pocket: 1 | Total: 5 | Feedly: 0
AD:
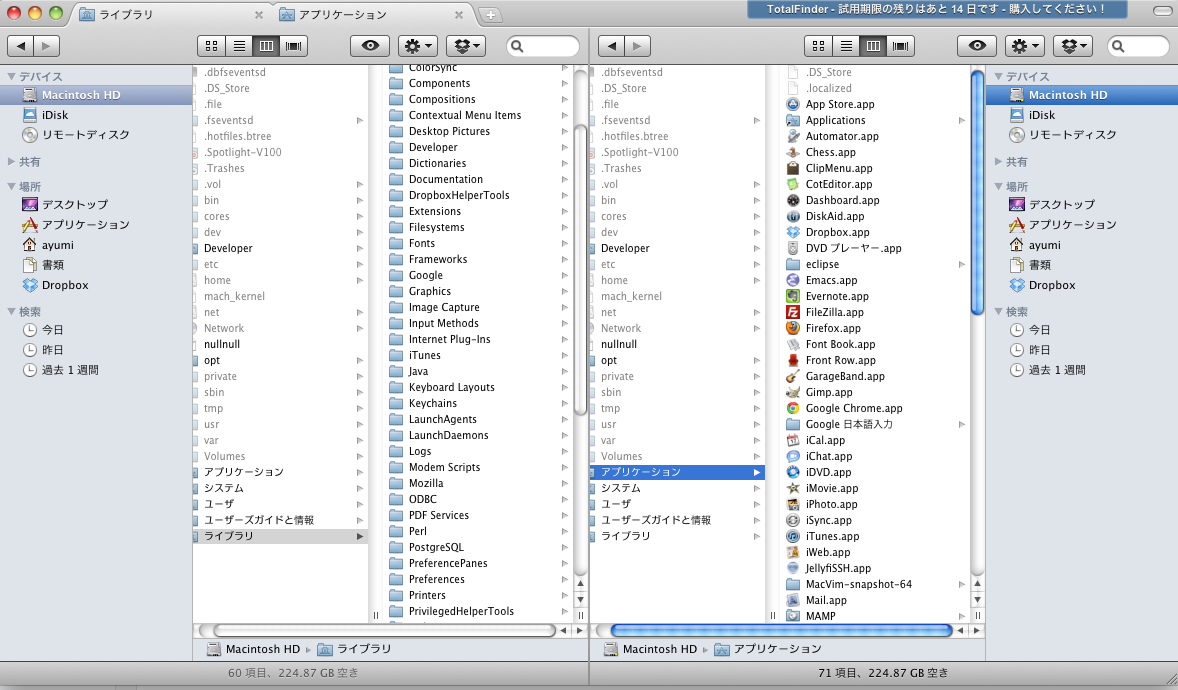
自宅では、Ubuntuを使っているのですが、F3を押すとフォルダ二分割機能機能が超実用的だったのですが、
macには標準でその機能がありません。
そこで調べると、TotalFinderを発見。
さっそくデモ版をDLしてインストールしてきます。
タブは見ればわかるのですが、二分割は、「⌘+U」で二分割可能です。
まだ購入してないけど、おそらく購入します。
あと便利なショートカットとして、現在選択しているフォルダーを起点?フォルダにできるショートカットがあります。
「⇧⌘;」
詳しいやり方はこちら
http://totalfinder.binaryage.com/folders-on-top

Twitter: 0 | Facebook: 0 | Google Plus: 0 | Hatena: 0 | Pocket: 0 | Total: 0 | Feedly: 0
AD:
Ruby1.9、Rails3.0.7、gem1.6.2の環境下で、deviseをbundleのinstallしようとしてなかなかうまく行かなかったのですが、
最後は単純に解決したので同じミスをおかさないようにメモしておきます。
エラー内容
[ruby]
$ vi Gemfile
gem ‘devise’, ‘1.1.5’
$ bundle install
/Users/hoge/.rvm/rubies/ruby-1.9.2-p180/lib/ruby/site_ruby/1.9.1/rubygems/requirement.rb:72:in `parse’: Illformed requirement [“1,1,5”] (ArgumentError)
[/ruby]
解決方法
上記のようなエラーがでて、いろいろ試してみた結果、
[ruby]
$ vi Gemfile
gem ‘devise’ ←よけいなバージョンを消したら解決
[/ruby]
Twitter:
Warning: Undefined array key "Twitter" in /home/sazaeau/mizoshiri.com/public_html/blog.mizoshiri.com/wp-content/plugins/sns-count-cache/sns-count-cache.php on line 2897
0 | Facebook: 0 | Google Plus:
Warning: Undefined array key "Google+" in /home/sazaeau/mizoshiri.com/public_html/blog.mizoshiri.com/wp-content/plugins/sns-count-cache/sns-count-cache.php on line 2897
0 | Hatena: 0 | Pocket: 0 | Total: 0 | Feedly: 0
AD:
最近MacでRailsの環境を行っているのですが、Rails3にアップデート( たしかMacPortでアップデートしたような)
して、Mysqlで開発を行おうとしたらエラーがでたので、そのメモを書いておきます。
下記のようなコマンドでプロジェクト?を生成して、さっそく走らしてみる下記のエラー
[bash]$ rails new hoge -d mysql
$ cd /hoge/
$ rails s
dyld: lazy symbol binding failed: Symbol not found: _mysql_get_client_info
Referenced from: /Library/Ruby/Gems/1.8/gems/mysql2-0.3.2/ext/mysql2/mysql2.bundle
Expected in: flat namespace
dyld: Symbol not found: _mysql_get_client_info
Referenced from: /Library/Ruby/Gems/1.8/gems/mysql2-0.3.2/ext/mysql2/mysql2.bundle
Expected in: flat namespace
[/bash]
検索してみていろいろ試してみるが、どれもうまく行かず、最終的に下記のページの内容で解決
http://stackoverflow.com/questions/5894102/bundle-command-the-wrong-mysql2-gem-always-0-3-2
gemのmysqlのライブラリの上げて解決
[bash]
$ sudo gem uninstall mysql2 -i /Library/Ruby/Gems/1.8
$ gem ‘mysql2′,’0.2.7’
$ bundle install
[/bash]
Twitter:
Warning: Undefined array key "Twitter" in /home/sazaeau/mizoshiri.com/public_html/blog.mizoshiri.com/wp-content/plugins/sns-count-cache/sns-count-cache.php on line 2897
0 | Facebook: 0 | Google Plus:
Warning: Undefined array key "Google+" in /home/sazaeau/mizoshiri.com/public_html/blog.mizoshiri.com/wp-content/plugins/sns-count-cache/sns-count-cache.php on line 2897
0 | Hatena: 0 | Pocket: 0 | Total: 0 | Feedly: 0


