AD:
Gemの指定
ローカルのGem
|
|
gem 'activeadmin', :git => 'git@github.com:gregbell/active_admin.git' |
HerokuのGem
|
|
gem 'activeadmin', github: 'gregbell/active_admin' |
もしローカルで、Herokuの指定方法だと、下記の用にcloneエラーがでてしまいます。
|
|
Retrying git clone 'git://github.com/gregbell/active_admin.git' "/home/vagrant/.rbenv/versions/2.0.0-p481/lib/ruby/gems/2.0.0/cache/bundler/git/active_admin-d67faab65e9b74efbc8efb4a777a851e9f78b2ca" --bare --no-hardlinks --quiet due to error (2/3): Bundler::Source::Git::GitCommandError Git error: command `git clone 'git://github.com/gregbell/active_admin.git' "/home/vagrant/.rbenv/versions/2.0.0-p481/lib/ruby/gems/2.0.0/cache/bundler/git/active_admin-d67faab65e9b74efbc8efb4a777a851e9f78b2ca" --bare --no-hardlinks --quiet` in directory /vagrant/??? has failed. |
地味に悩んだのですが、 git://をhttpsに変換するように、configに追加するようにして、herokuと同じ指定方法で動くようになりました。
|
|
git config --global url."https://".insteadOf git:// |
Twitter:
Warning: Undefined array key "Twitter" in /home/sazaeau/mizoshiri.com/public_html/blog.mizoshiri.com/wp-content/plugins/sns-count-cache/sns-count-cache.php on line 2897
0 | Facebook: 0 | Google Plus:
Warning: Undefined array key "Google+" in /home/sazaeau/mizoshiri.com/public_html/blog.mizoshiri.com/wp-content/plugins/sns-count-cache/sns-count-cache.php on line 2897
0 | Hatena: 0 | Pocket: 0 | Total: 0 | Feedly: 0
AD:
Googleさんで調べていたのですが、情報が古かったり、微妙にわかりにくかったので、自分のためにもメモとして残しておきます。
リモートサーバの接続設定
ローカルでの作業
鍵を作ります
|
|
$ cd ~/ $ ssh-keygen -t rsa $ tail ~/.ssh/id_rsa.pub ssh-rsa adadsa2!......nuias hoge@hoge.com |
リモートサーバの設定
authorized_keysの一番下に上記の公開鍵を追加
|
|
$ vi ~/.ssh/authorized_keys |
これでssh username@serverhost.comなりで接続できるようになります。
リモートサーバにリポジトリを作成
リモートサーバでの作業
|
|
$ mkdir -p ~/repo/hoge-blog.git $ cd ~/repo/hoge-blog.git $ git init --bare $ cp hooks/post-update.sample hooks/post-update $ vi hooks/post-update echo echo "Pulling from git" echo cd <span class="red">/var/www/hoge-blog</span>; git --git-dir=.git pull $ chmod +x ~/repo/hoge-blog.git/hooks/post-update |
注意点
– post-updateの中に、exec git update-server-infoがあれば、その前に上記のCodeは追加してください。
– cd /var/www/hoge-blog; git –git-dir=.git pullの’/var/www/hoge-blog’はDeployのPathと合わせてください。
リモートサーバにフォルダを設置
リモートサーバでの作業
|
|
$ cd /var/www/ $ git clone ~/repo/hoge-blog.git |
ローカルののgitにRemoteを追加
ローカルでの作業
|
|
$ cd ~/work/hoge-blog-local/ $ git remote add production username@serverhost.com:/home/usernmae/repo/hoge-blog |
いざDeploy
ローカルでの作業
|
|
$ git push production master remote: remote: Pulling from git remote: remote: From /home/usernmae/repo/hoge-blog remote: as122..222de master -> origin/master remote: Updating as122..222de |
Twitter:
Warning: Undefined array key "Twitter" in /home/sazaeau/mizoshiri.com/public_html/blog.mizoshiri.com/wp-content/plugins/sns-count-cache/sns-count-cache.php on line 2897
0 | Facebook: 0 | Google Plus:
Warning: Undefined array key "Google+" in /home/sazaeau/mizoshiri.com/public_html/blog.mizoshiri.com/wp-content/plugins/sns-count-cache/sns-count-cache.php on line 2897
0 | Hatena: 0 | Pocket: 1 | Total: 1 | Feedly: 0
AD:
MacのHomebrew自体のバージョンを上げようと思いupdateするとエラーでできませんでした。
|
|
$ sudo brew update Error: Failure while executing: git pull -q origin refs/heads/master:refs/remotes/origin/master |
解決方法
brewさん自体がすでに更新されている状態なので、updateするとpullしようとするとぶつかってしまうのが問題のようです。
なので、git fetchで最新を落として、resetでインデックス、ワーキングツリーをすべて変更しています。
|
|
$ cd /usr/local $ git fetch origin $ git reset --hard origin/master |
参考ページ
Twitter:
Warning: Undefined array key "Twitter" in /home/sazaeau/mizoshiri.com/public_html/blog.mizoshiri.com/wp-content/plugins/sns-count-cache/sns-count-cache.php on line 2897
0 | Facebook: 0 | Google Plus:
Warning: Undefined array key "Google+" in /home/sazaeau/mizoshiri.com/public_html/blog.mizoshiri.com/wp-content/plugins/sns-count-cache/sns-count-cache.php on line 2897
0 | Hatena: 0 | Pocket: 0 | Total: 0 | Feedly: 0
AD:
Bitbucketとは
先ほど、Yahoo.co.jpで検索した感じだと、日本ではあんまり人気のないかもしれませんが、githubと同じようなサービスですが、僕が使用している理由は、無料で非公開レポジトリが作れます。
お金が発生するのは、今のところリポジトやグループに6人以上追加したい場合です。詳しい値段はこちら
Pivotal Tracker
こちらも日本ではまだまだ人気がなさそうですが、アジャイルのプロジェクトマネージメントサービスです。
詳しくはこちらか – いまアツいアジャイルプロジェクト管理ツール9選+Pivotal Tracker入門 (1/3)
連携方法
1. Pivotal Trackerにいきます、それで右上のメニューからProfileをクリックします。
2. 画面下にAPI TOKENとありますので、そこでAPIのキーを作って、コピーします。
3. Bitbucketの繋げたいリポジトリに行きます、それで歯車のようまアイコンから、リポジトリの管理画面にいきます。
4. 左メニューから’Hooks’をクリックして、セレクトから、Pivotal Trackerを選んで、コピーしたAPIのキーを貼り付けます。
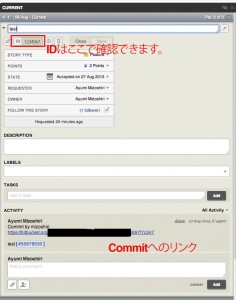
5. Pivotal Trackerでチケットを作成すると、IDが発行されるので、それをコピー(IDは1234657だったと)します。
6. 先ほどのチケットと関連する作業をコミットする際に、git -m “test [#1234657]”こんな感じでコミットして、pushします。
7. Pivotal Trackerのチケットの詳細を開くと、画像のように表示されるようなります。

Twitter: 0 | Facebook: 0 | Google Plus: 0 | Hatena: 0 | Pocket: 2 | Total: 2 | Feedly: 0
AD:
最近SSHのKeyを使ったのサービスを使用する際によくに聞かれるのと、パートナーさんのなどのMacを設定しないといけないのでよく使っている気がするのでメモ
|
|
$ ssh-keygen -t rsa -C "ayumi@sazae.com.au" Enter file in which to save the key (/home/ayumi/.ssh/id_rsa): (エンター) Enter passphrase (empty for no passphrase): (パスワード) $ chmod 600 ~/.ssh/id_rsa $ tail ~/.ssh/id_rsa.pub ssh-rsa anjkasndk/w4XFe2wispXpQa4/NwCzGZrmq41UxWKq7yfGHK0DZhZrzjVFDF06ebetW9XB48dlTPQqh68rIf/oh9p4NNcFRBeONUPpGwyJpN2C3hNRd/HJKER8RR6tfZU2DkFABAWNDasvqlyNkGwSPgDBbhREvS7xsAuvR6FDFl8hDzyqAZ+i1eyWDt1lqK6mP0NmxOU5d/cISAiOfkHE0A5YK1xL88UX9tgMcu5aXgAU4n4et7U3EdzdIvLNsvN1v+O20pJQMt4mSMj ayumi@sazae.com.au |
Twitter:
Warning: Undefined array key "Twitter" in /home/sazaeau/mizoshiri.com/public_html/blog.mizoshiri.com/wp-content/plugins/sns-count-cache/sns-count-cache.php on line 2897
0 | Facebook: 0 | Google Plus:
Warning: Undefined array key "Google+" in /home/sazaeau/mizoshiri.com/public_html/blog.mizoshiri.com/wp-content/plugins/sns-count-cache/sns-count-cache.php on line 2897
0 | Hatena: 0 | Pocket: 0 | Total: 0 | Feedly: 0
AD:
Bitbucketでソースを管理しているんですが、githubも使い出して、一度keyを整理しなおしに、下記のエラーがでて、Bitbucketにアクセスできなくなりました。
|
|
Warning: Permanently added the RSA host key for IP address '*.*.*.*' to the list of known hosts. |
調べてみると、ssh-keyが二つ(同じPCで過去に作成したもの)が登録されていたので、それを消して解決できました。
下記の画面より登録してあるKeyが確認できます。
https://bitbucket.org/account/ssh-keys/

Twitter:
Warning: Undefined array key "Twitter" in /home/sazaeau/mizoshiri.com/public_html/blog.mizoshiri.com/wp-content/plugins/sns-count-cache/sns-count-cache.php on line 2897
0 | Facebook: 0 | Google Plus:
Warning: Undefined array key "Google+" in /home/sazaeau/mizoshiri.com/public_html/blog.mizoshiri.com/wp-content/plugins/sns-count-cache/sns-count-cache.php on line 2897
0 | Hatena: 0 | Pocket: 1 | Total: 1 | Feedly: 0
AD:
bitbucketを使ってソースは管理しているのですが、下記のようにubuntuで設定しました。
|
|
$ pwd $ home/hoge $ ssh-keygen Generating public/private rsa key pair. Enter file in which to save the key (/home/hoge/.ssh/id_rsa): .ssh/bitbucket Enter passphrase (empty for no passphrase): パスワードを入力 Enter same passphrase again: パスワードを入力 Your identification has been saved in /home/hoge/.ssh/bitbucket. Your public key has been saved in /home/hoge/.ssh/bitbucket.pub. $ chmod 600 .ssh/bitbucket.pub $ sudo vi .ssh/config Host bitbucket.org Compression yes HostName bitbucket.org User hg IdentityFile ~/.ssh/bitbucket.pub |
上記ができたら、id_rsa.pubを下記のページからあげて認証は終了
https://bitbucket.org/account/#ssh-keys
Bad owner or permissions
|
|
$ git clone git@bitbucket.org:hoge/test.git Bad owner or permissions on /home/hoge/.ssh/config fatal: The remote end hung up unexpectedly |
下記のようなエラーがでました。
sshの設定によりますが、パーミッションの設定を変更で解決しました。
|
|
$ chmod 600 /home/hoge/.ssh/config |
Twitter:
Warning: Undefined array key "Twitter" in /home/sazaeau/mizoshiri.com/public_html/blog.mizoshiri.com/wp-content/plugins/sns-count-cache/sns-count-cache.php on line 2897
0 | Facebook: 0 | Google Plus:
Warning: Undefined array key "Google+" in /home/sazaeau/mizoshiri.com/public_html/blog.mizoshiri.com/wp-content/plugins/sns-count-cache/sns-count-cache.php on line 2897
0 | Hatena: 4 | Pocket: 2 | Total: 6 | Feedly: 0
AD:
なるべく月額の費用を払いたくないので、自分でgitサーバを立ち上げることにしました。
その際のメモです。
いろいろつまずいたとこがあるので、同じ問題にぶつかった人のお役に立てれば幸いです。
運営環境
開発PC:Ubuntu 10.10 Desktop
設置先:Ubuntu 11.04 Server
構築方法等は、ページ下にある参考ページにより詳しく記載してありますので、そちらを参照してください。
トラブったところ&迷ったところ
既に使用しているユーザの接続
はじめに、sshの接続を許可している鍵もちのユーザを使用としたのですが、
鍵の登録がうまくいかなかったので、gitの接続専用ユーザを作成しました。
その際に、サーバからcloneしてみると下記のエラーがでました、一応頻繁に使用しているユーザなので、既に使用している鍵ファイルが壊れるのが怖かったので、諦めました。
ちなみに、エラー内容下記のようなものでした
|
|
$ git clone ssh://ユーザ名@localhost:ポート番号/gitosis-admin.git Cloning into gitosis-admin... Enter passphrase for key '/home/ユーザ名/.ssh/id_rsa': fatal: '/gitosis-admin.git' does not appear to be a git repository fatal: The remote end hung up unexpectedly |
ポートを指定して接続
sshのポートを変更している場合は、下記のようにアクセスします。
|
|
git clone ssh://ユーザ名@192.168.0.1:ポート番号 |
開発PCの設定について
sshの接続で、鍵認証を行っているんですが、それをどうやって開発PCに読み込ましていいのかに悩みました。
下記の方法で、うまくいきました。
|
|
$ vi /home/ユーザ名/.ssh/サーバから取得した公開鍵(場所はどこでもOK) $ chmod 700 サーバから取得した公開鍵 #sshの設定によるがStrictModes yesにしているときに必要 $ vi /home/ユーザ名(自分の使用しているもの)/.ssh/config Host サーバのIP User サーバのgit用のユーザ名 Hostname サーバのホスト名 PreferredAuthentications publickey IdentityFile ~/.ssh/鍵.key |
新規プロジェクトの追加方法
環境は以外に簡単に構築できたのですが、新規プロジェクトが、どこでどうすればいいのか迷ったので、メモしておきます。
これらの作業はすべて、開発環境(つまりgitのサーバでない場所で行いました。)
1 2 3 4 5 6 7 8 9 10 11 12 13 14 15 16 17 18 19 20 21 22 23 |
$ cd /home/ユーザ名(開発PCのユーザ)/ #ちなみにこの場所はどこでもいいのです。 $ git clone ssh://git用のユーザ名@192.1.*.*:ポート番号/gitosis-admin.git $ cd ../gitosis-admin/ $ vi gitosis.conf [gitosis] loglevel = DEBUG #これを入れておくとエラー時に詳細を表示 [group mygroup] writable = myproject members = git用のユーザ名@git用PCのホスト名 $ pwd /home/ユーザ名(開発PCのユーザ)/gitosis-admin $ git commit -a -m 'add myproject' $ git push #作業を本番反映 #上記の作業で、myproject.gitの準備ができました。 $ cd /home/ユーザ名(開発PCのユーザ)/www/ $ git clone ssh://git用のユーザ名@192.1.*.*:ポート番号/myproject.git $ cd myproject $ touch dummy $ git add dummy $ git commit -m 'dummy to create repo' $ git push origin master:refs/heads/master #masterにして本番に反映 |
インストールに参考サイトにさせてもらったページ
git sshサーバの構築
Twitter:
Warning: Undefined array key "Twitter" in /home/sazaeau/mizoshiri.com/public_html/blog.mizoshiri.com/wp-content/plugins/sns-count-cache/sns-count-cache.php on line 2897
0 | Facebook: 0 | Google Plus:
Warning: Undefined array key "Google+" in /home/sazaeau/mizoshiri.com/public_html/blog.mizoshiri.com/wp-content/plugins/sns-count-cache/sns-count-cache.php on line 2897
0 | Hatena: 1 | Pocket: 1 | Total: 2 | Feedly: 0


