AD:
Panelsモジュールは、テンプレートなどをいじることなく、URLやコンテンツによってデザインを変更できるようになります。
使い方が難しいので覚書しておきます。
モジュールの有効化
Drushで一撃で有効化します。
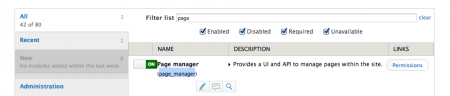
その後、各種ページでPanelsを使いたいばあいはPage Managerも有効にしておきます。
ユーザにページをRoleによってデザインを変更したい場合
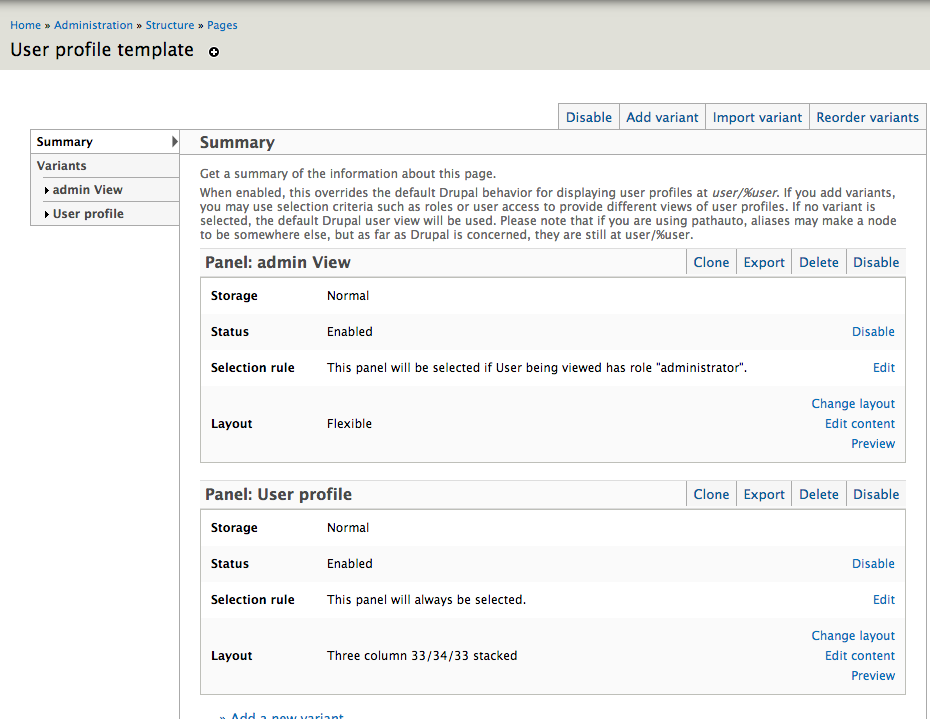
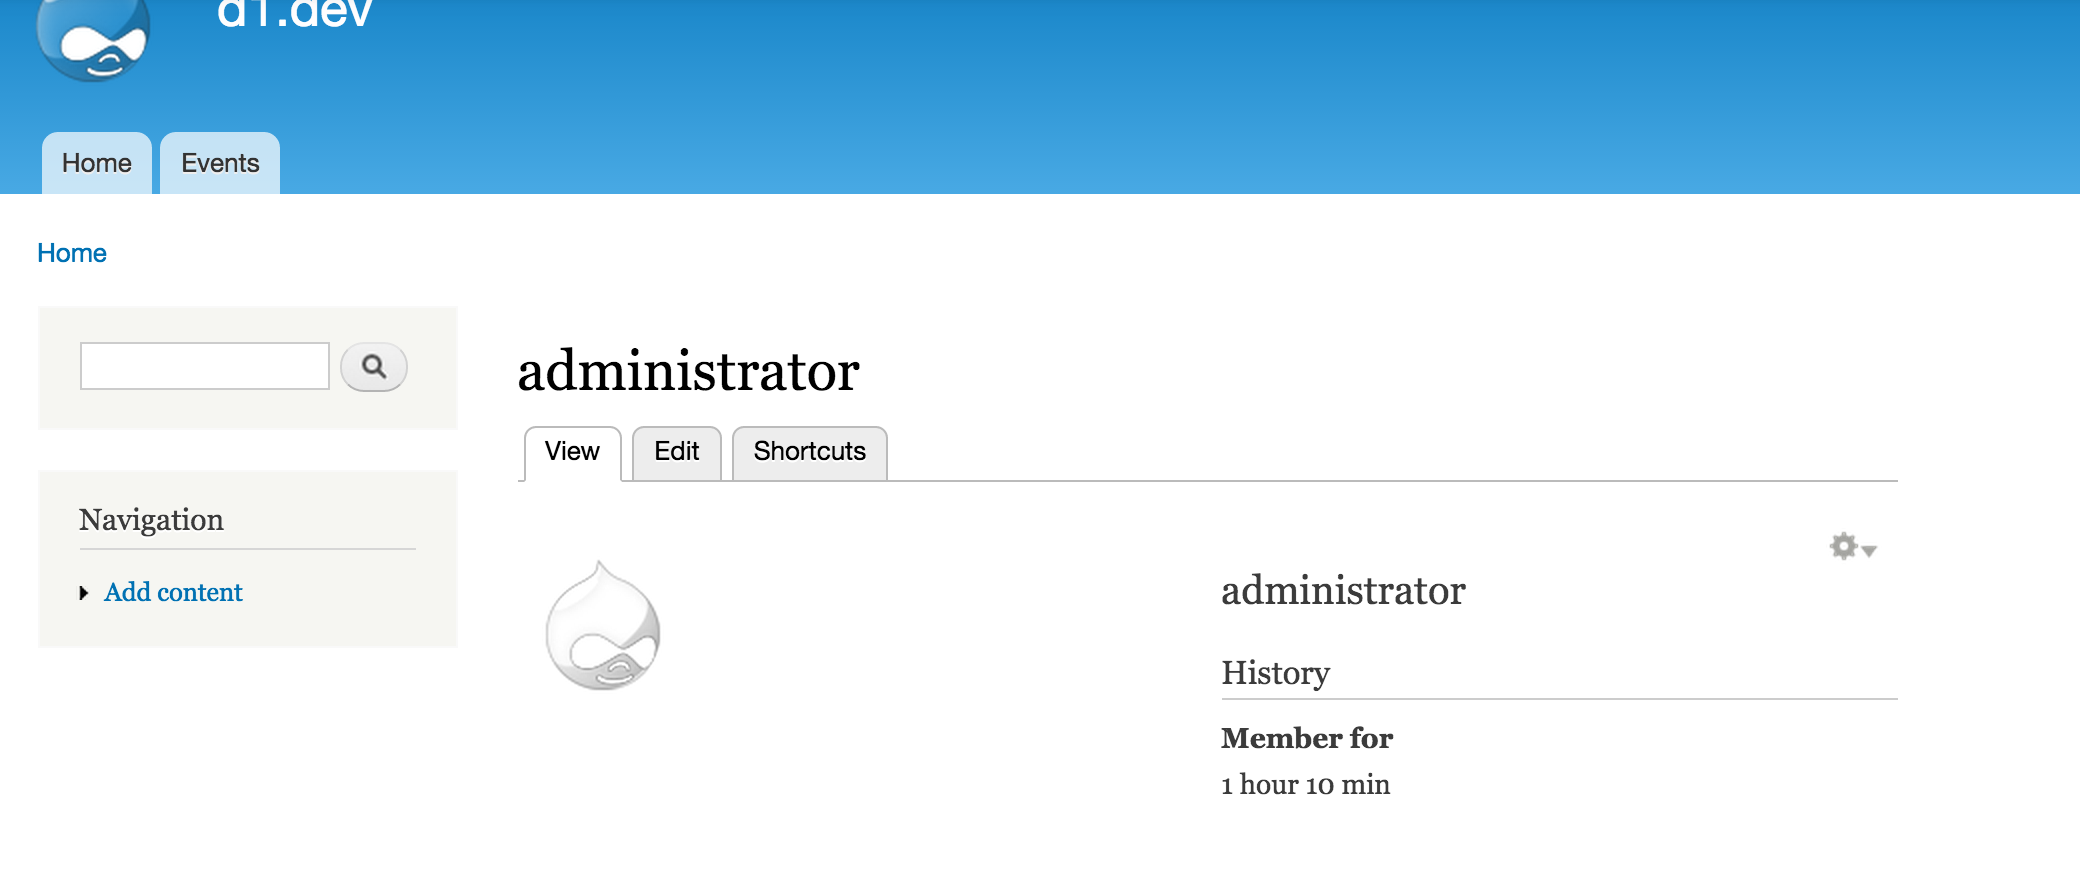
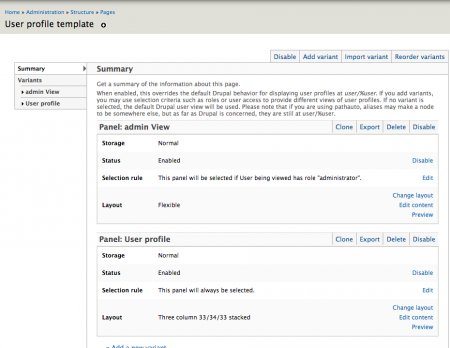
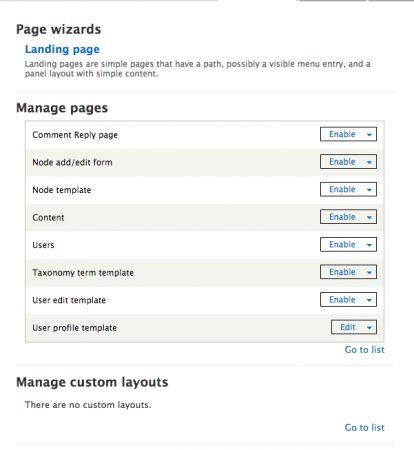
Panelの参考として、ユーザのプロフィールページをRoleによってデザインを変更したい場合を紹介します。
1./admin/structure/panelsからUser profile templateをEditします。
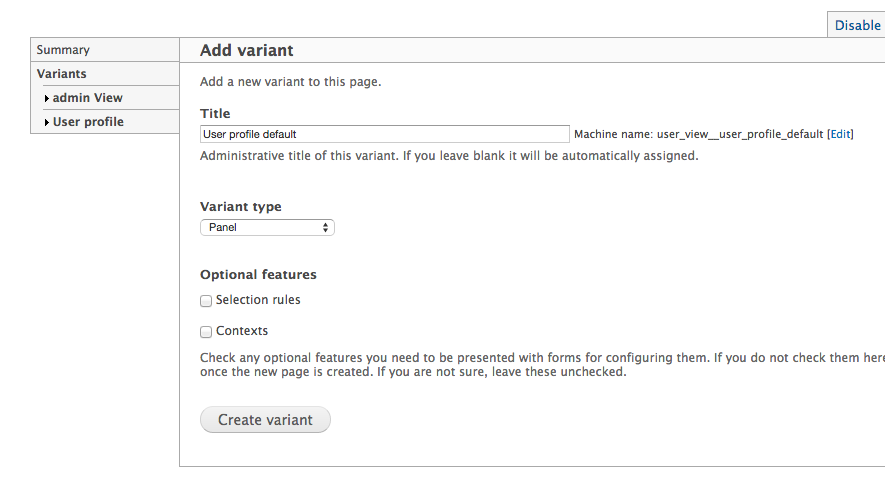
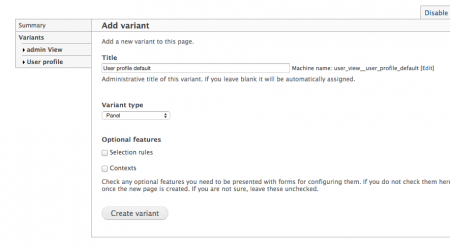
2.Add variantでVariantを追加します。
はじめにデフォルトなるもの(条件にひかからないもの)を追加しておきます。
Title: User profile defaultとにでもしておきます。
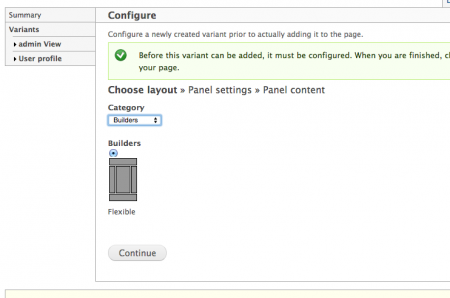
3.Layoutを選びます。
4.各種CSSなどの設定をいれます。
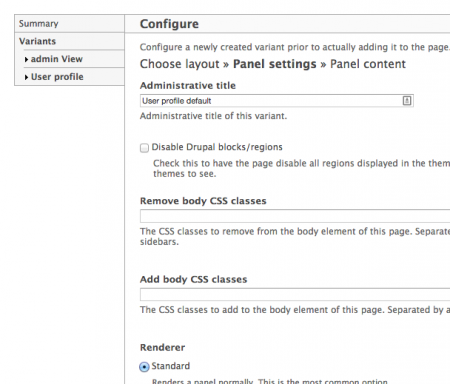
ここでこいつにCheckいれるとサイドバーなどのBlockが消えます。

5. 選択レイアウトになにを表示したいか設定します。
表示したい内容を選択して保存します。

とりあえず、これでデフォルトに表示されるものは同じです。
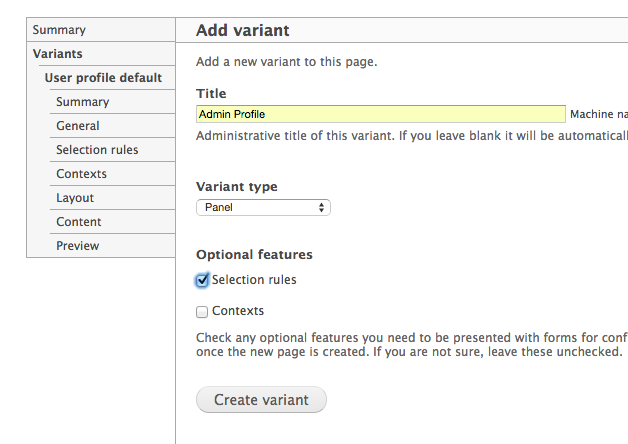
次に、Adminユーザの場合のルールを追加してデザインを変更したいと思います。
1. Add variantで追加
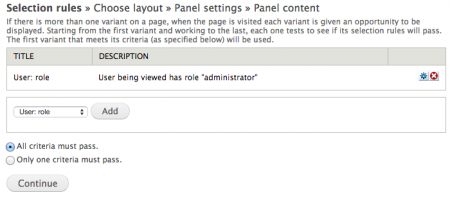
追加する際に、Selection rulesを選択して追加してください。

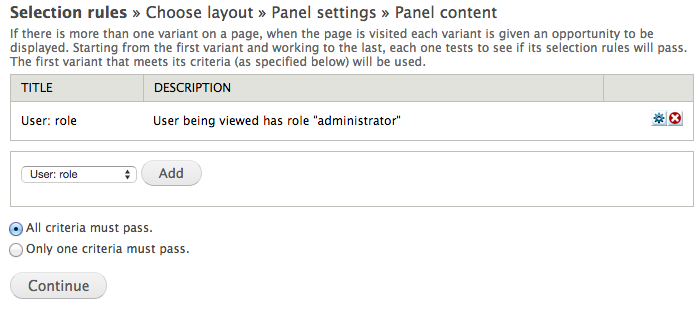
2. Ruleを追加します。
RoleがAdminの場合というRuleを追加します。
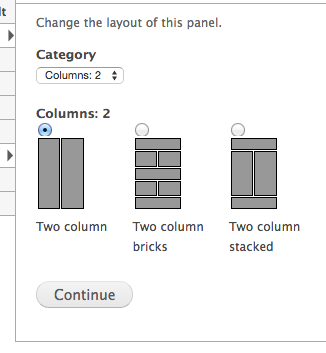
3. Adminの時はLayoutを2カラムに変更します。
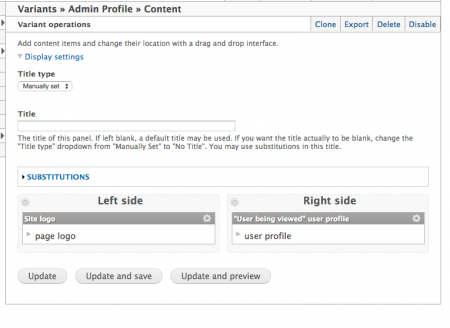
4. Profileの横にサイトのロゴを表示させます。
コンテンツを選んで保存します。
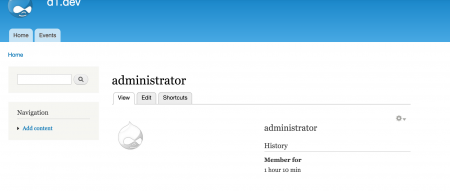
Adminユーザの時だけ、サイトロゴがサイドに表示されるようになりました。
注意
Variantは上から適応されるので、Weightの並びに気をつけてください。

Twitter:
Warning: Undefined array key "Twitter" in /home/sazaeau/mizoshiri.com/public_html/blog.mizoshiri.com/wp-content/plugins/sns-count-cache/sns-count-cache.php on line 2897
0 | Facebook: 0 | Google Plus:
Warning: Undefined array key "Google+" in /home/sazaeau/mizoshiri.com/public_html/blog.mizoshiri.com/wp-content/plugins/sns-count-cache/sns-count-cache.php on line 2897
0 | Hatena: 2 | Pocket: 2 | Total: 4 | Feedly: 0
AD:
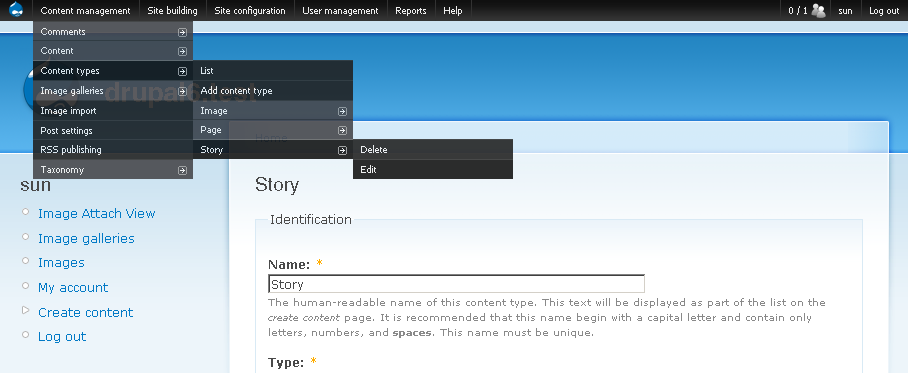
新規にDrupalのサイトを作成した場合に下記のモジュールをインストールしてからスタートします。
ちなみに、Drupal7です。
- 更新:2015/07/27
- 更新:2015/07/19
- 更新:2015/07/17
- Admin Menu
-
管理画面が格段に使いやすくなります。
もしStandardでインストールした場合下記のモジュールをDisableしてから使ってください。
- Features
-
各種データベースの変更をコードで管理できるようにします。このモジュールは管理する際に便利なので、後記事を書きます。
- Context
-
- Panels
-
- ctool
-
これを入れないことには、主要モジュールが動かないことが多々なので、入れておきます。API系のモジュールです。
- Views
- jquery_update
-
ページ作成、ページ修正、URLなどをAdminページで管理できるようになります。Viewsも大変便利なので、あとで記事を書きたいと思います。
- Module Filter
-
モジュールがたくさん増えてきた際などに、フリーワードでモジュールを検索できるようになるので便利です。
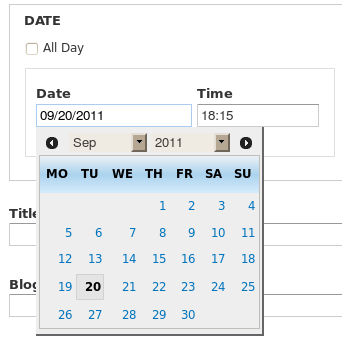
- Date
-
これは標準でついてもいいような気がするのですが、日付を扱うフィールドを拡張してください。
- jquery_update
-
jQueryのバージョンなどを管理画面から管理できるようになります。
モジュールの有効化はDrushで
各種モジュールの有効化はDrushで一発です。
|
|
drush en -y admin_menu features context panels ctool views jquery_update module_filter date |
Twitter:
Warning: Undefined array key "Twitter" in /home/sazaeau/mizoshiri.com/public_html/blog.mizoshiri.com/wp-content/plugins/sns-count-cache/sns-count-cache.php on line 2897
0 | Facebook: 0 | Google Plus:
Warning: Undefined array key "Google+" in /home/sazaeau/mizoshiri.com/public_html/blog.mizoshiri.com/wp-content/plugins/sns-count-cache/sns-count-cache.php on line 2897
0 | Hatena: 0 | Pocket: 2 | Total: 2 | Feedly: 0
AD:
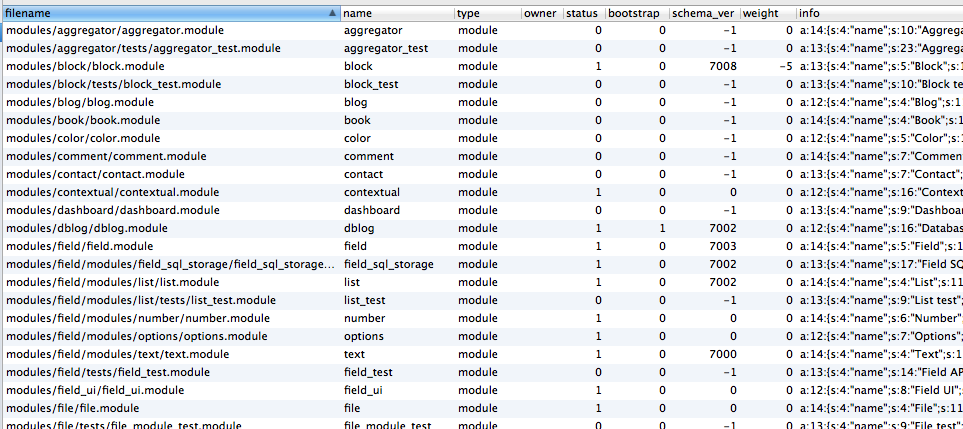
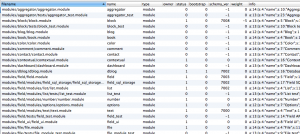
先日DrupalのあるモジュールがFunctionのredeclareエラー(同じFunctionを2回呼んでいるよー)がで困った際に調査してわかりましたので、メモしておきます。
調べてみるとたしかにフォルダ別に同じモジュールがあることがわかりました。
でも、どちらのモジュールを使用しているか、Adminページではわからなかったて、同僚に聞いてみるとsystemテーブルなるものがあるようです。
systemテーブルに下記のようにモジュールの種類や、Weight、ファイルのパスなどを確認できるようになっております。
Twitter:
Warning: Undefined array key "Twitter" in /home/sazaeau/mizoshiri.com/public_html/blog.mizoshiri.com/wp-content/plugins/sns-count-cache/sns-count-cache.php on line 2897
0 | Facebook: 0 | Google Plus:
Warning: Undefined array key "Google+" in /home/sazaeau/mizoshiri.com/public_html/blog.mizoshiri.com/wp-content/plugins/sns-count-cache/sns-count-cache.php on line 2897
0 | Hatena: 1 | Pocket: 0 | Total: 1 | Feedly: 0
AD:
本来であれば、Twitter Bootstrap3はIE8をサポートしているはずなんですが、なぜかDrupalのTwitter Bootstrap Themeを使用するとIE8でうまくいきませんでした。
下記の内容で問題なく表示されるようになりました。
原因はIE8がCDNをサポートしていないのが問題ではないかと言われていますが、実際のところなぜ起きるのかは追っていません。
モジュールのインストール
下記の2つのモジュールをインストール
Bootstrap Library
Respond.js
|
|
drush en bootstrap_library respondjs -y |
CSS&JSのAggregate and compress化
下記のページより変更が可能です。
/admin/config/development/performance

Twitter:
Warning: Undefined array key "Twitter" in /home/sazaeau/mizoshiri.com/public_html/blog.mizoshiri.com/wp-content/plugins/sns-count-cache/sns-count-cache.php on line 2897
0 | Facebook: 0 | Google Plus:
Warning: Undefined array key "Google+" in /home/sazaeau/mizoshiri.com/public_html/blog.mizoshiri.com/wp-content/plugins/sns-count-cache/sns-count-cache.php on line 2897
0 | Hatena: 0 | Pocket: 0 | Total: 0 | Feedly: 0
AD:
はじめは、プラグインが必要かと思ったのですが、管理画面より設定が可能です。
下記のページより設定できます。
/admin/config/development/performance
Twitter:
Warning: Undefined array key "Twitter" in /home/sazaeau/mizoshiri.com/public_html/blog.mizoshiri.com/wp-content/plugins/sns-count-cache/sns-count-cache.php on line 2897
0 | Facebook: 0 | Google Plus:
Warning: Undefined array key "Google+" in /home/sazaeau/mizoshiri.com/public_html/blog.mizoshiri.com/wp-content/plugins/sns-count-cache/sns-count-cache.php on line 2897
0 | Hatena: 0 | Pocket: 0 | Total: 0 | Feedly: 0
AD:
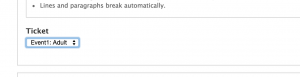
DrupalのCommerceを使ってサイトを構築していたのですが、チケットを販売するにあたってチケットの枚数にあわせて、個人情報を入力してもらいたいとの要望がありました。
今回がはじめてのDurpalのサイト構築なので、カスタムモジュールなどは作りたくなかったのですが、なんとか作れました。
ちゃんとValidationも自分で追加できるようになっています。
モジュールについて
Drupalのモジュールはこんな感じで作るらしいです。
フォルダ名(hoge_module)
├hoge_module.info – モジュールの内容
├hoge_module.module – Code
└hoge_module.install – Database周り
コード
コードはgithubのリポジトリに上げてあけておきました。
https://github.com/mizoshiri/drupal-commerce-add-additinal-form
メモ
どの画面で表示させるかは下記のページより変更できます。
/admin/commerce/config/checkout
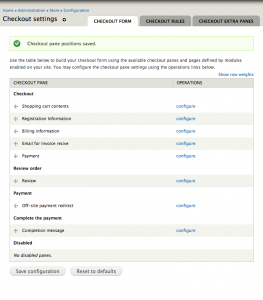
フォームの各要素ここから確認できます。
https://api.drupal.org/api/drupal/developer!topics!forms_api_reference.html/
ここのほうがよくまとめてあります。
http://atendesigngroup.com/blog/custom-commerce-checkout-panes
Twitter:
Warning: Undefined array key "Twitter" in /home/sazaeau/mizoshiri.com/public_html/blog.mizoshiri.com/wp-content/plugins/sns-count-cache/sns-count-cache.php on line 2897
0 | Facebook: 0 | Google Plus:
Warning: Undefined array key "Google+" in /home/sazaeau/mizoshiri.com/public_html/blog.mizoshiri.com/wp-content/plugins/sns-count-cache/sns-count-cache.php on line 2897
0 | Hatena: 0 | Pocket: 0 | Total: 0 | Feedly: 0
AD:
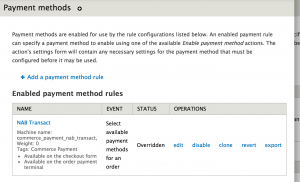
Nab TransactをPayment Getwayとして利用しております。
Step
1.Modulesに有効化
|
|
drush en commerce_nab_transact -y; drush en commerce commerce_ui -y; drush en commerce_customer commerce_customer_ui -y; drush en commerce_price -y; drush en commerce_line_item commerce_line_item_ui -y; drush en commerce_order commerce_order_ui -y; drush en commerce_checkout commerce_payment commerce_product -y; drush en commerce_cart commerce_product_pricing -y; drush en commerce_product_ui -y; drush en commerce_tax_ui -y; drush en commerce_payment_example -y; drush en commerce_payment_ui -y; drush en commerce_product_pricing_ui -y; |
設定は下記のURLよりできます。
http://your-drupal-site.com/admin/commerce/
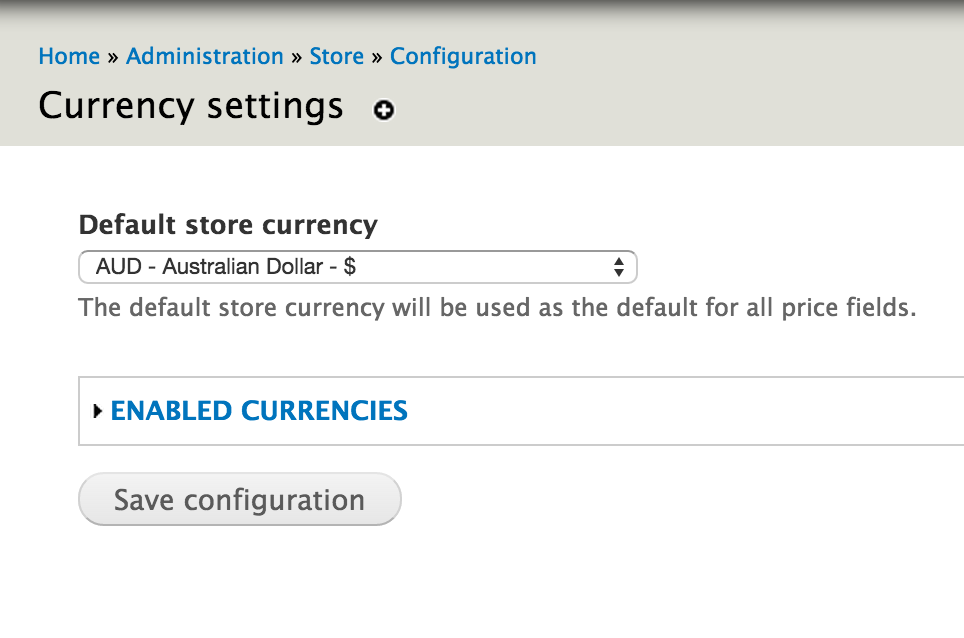
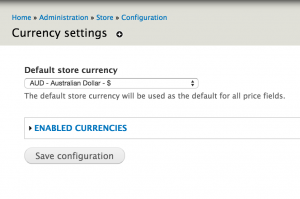
2.通貨を変更する
/admin/commerce/config/currency
3.Payment Gatewayを有効にする
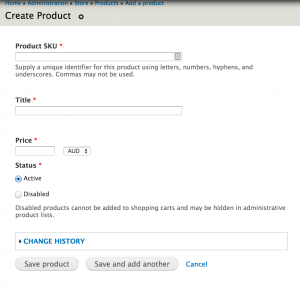
4.商品を追加する
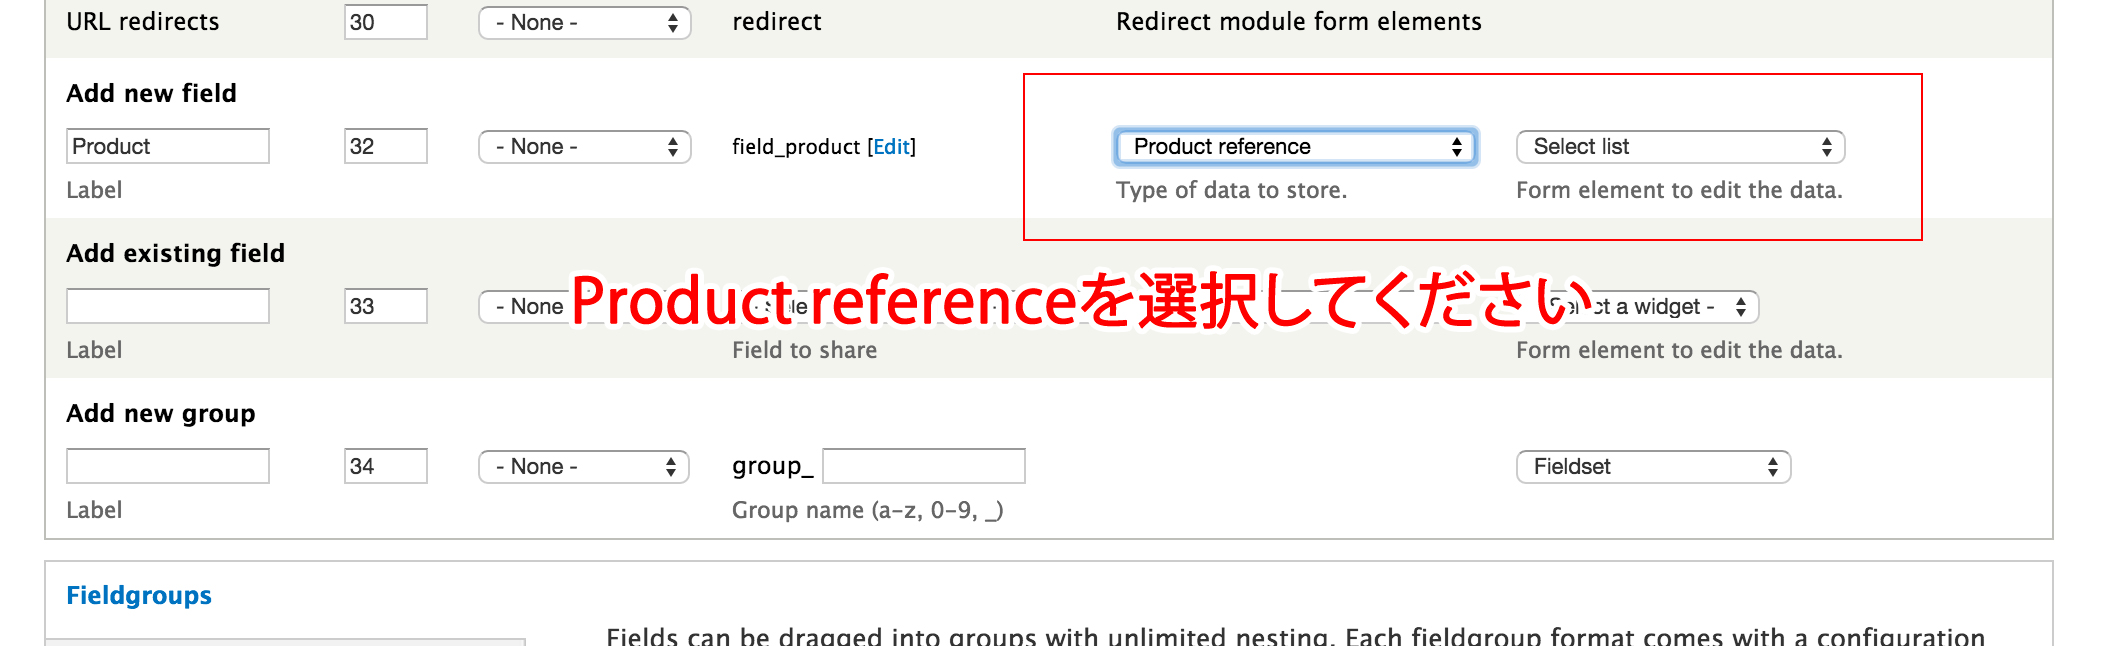
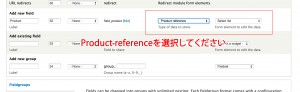
5.NodeとProductをつなげる
NodeのManage filedsより新しいFiledを追加する
6.Nodeの追加*編集画面よりProductを選択する
7.Manage Displayよりカゴを表示させる
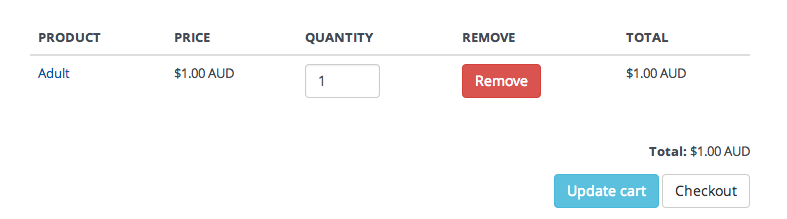
8.終了です。
Add Cartと表示されていたらOKです。
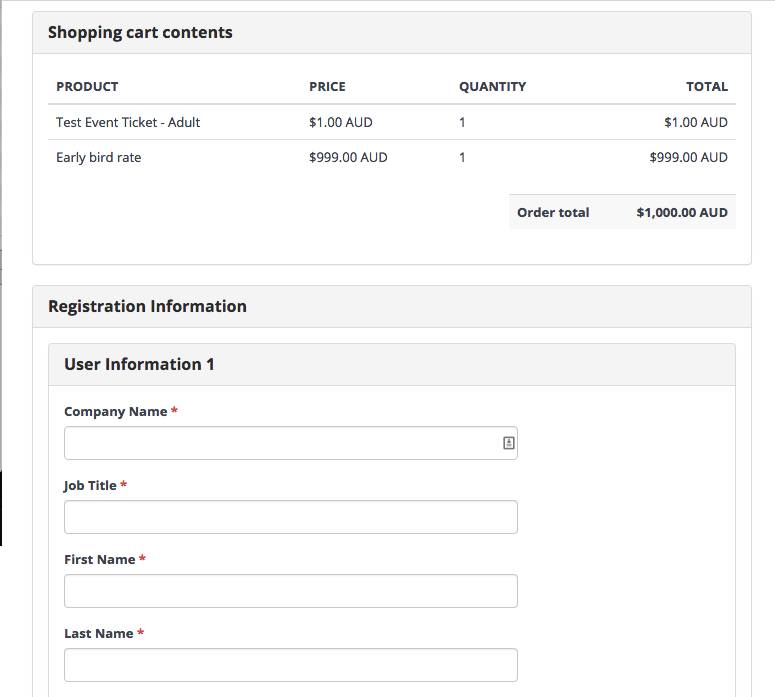
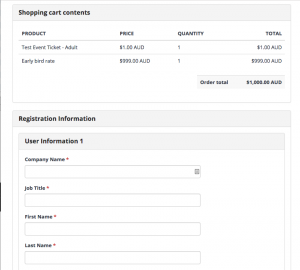
下記の画像は変更されています。
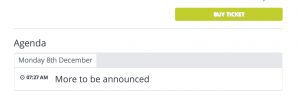
買い物カゴはこんな感じ

Twitter:
Warning: Undefined array key "Twitter" in /home/sazaeau/mizoshiri.com/public_html/blog.mizoshiri.com/wp-content/plugins/sns-count-cache/sns-count-cache.php on line 2897
0 | Facebook: 0 | Google Plus:
Warning: Undefined array key "Google+" in /home/sazaeau/mizoshiri.com/public_html/blog.mizoshiri.com/wp-content/plugins/sns-count-cache/sns-count-cache.php on line 2897
0 | Hatena: 0 | Pocket: 0 | Total: 0 | Feedly: 0
AD:
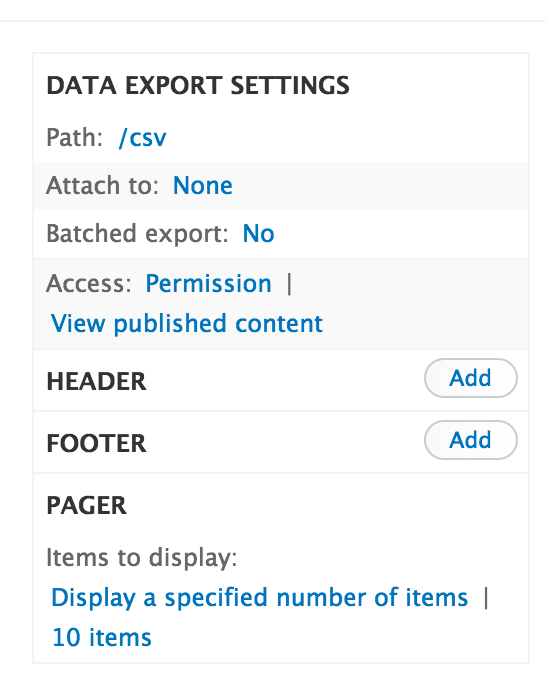
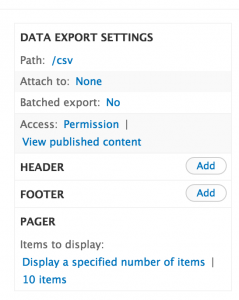
DrupalでコンテンツをCSV等にエクスポートしたい場合は、Views Data Exportを使うと簡単にできます。
Step
1.Moduleを有効にする
|
|
drush en views_data_export |
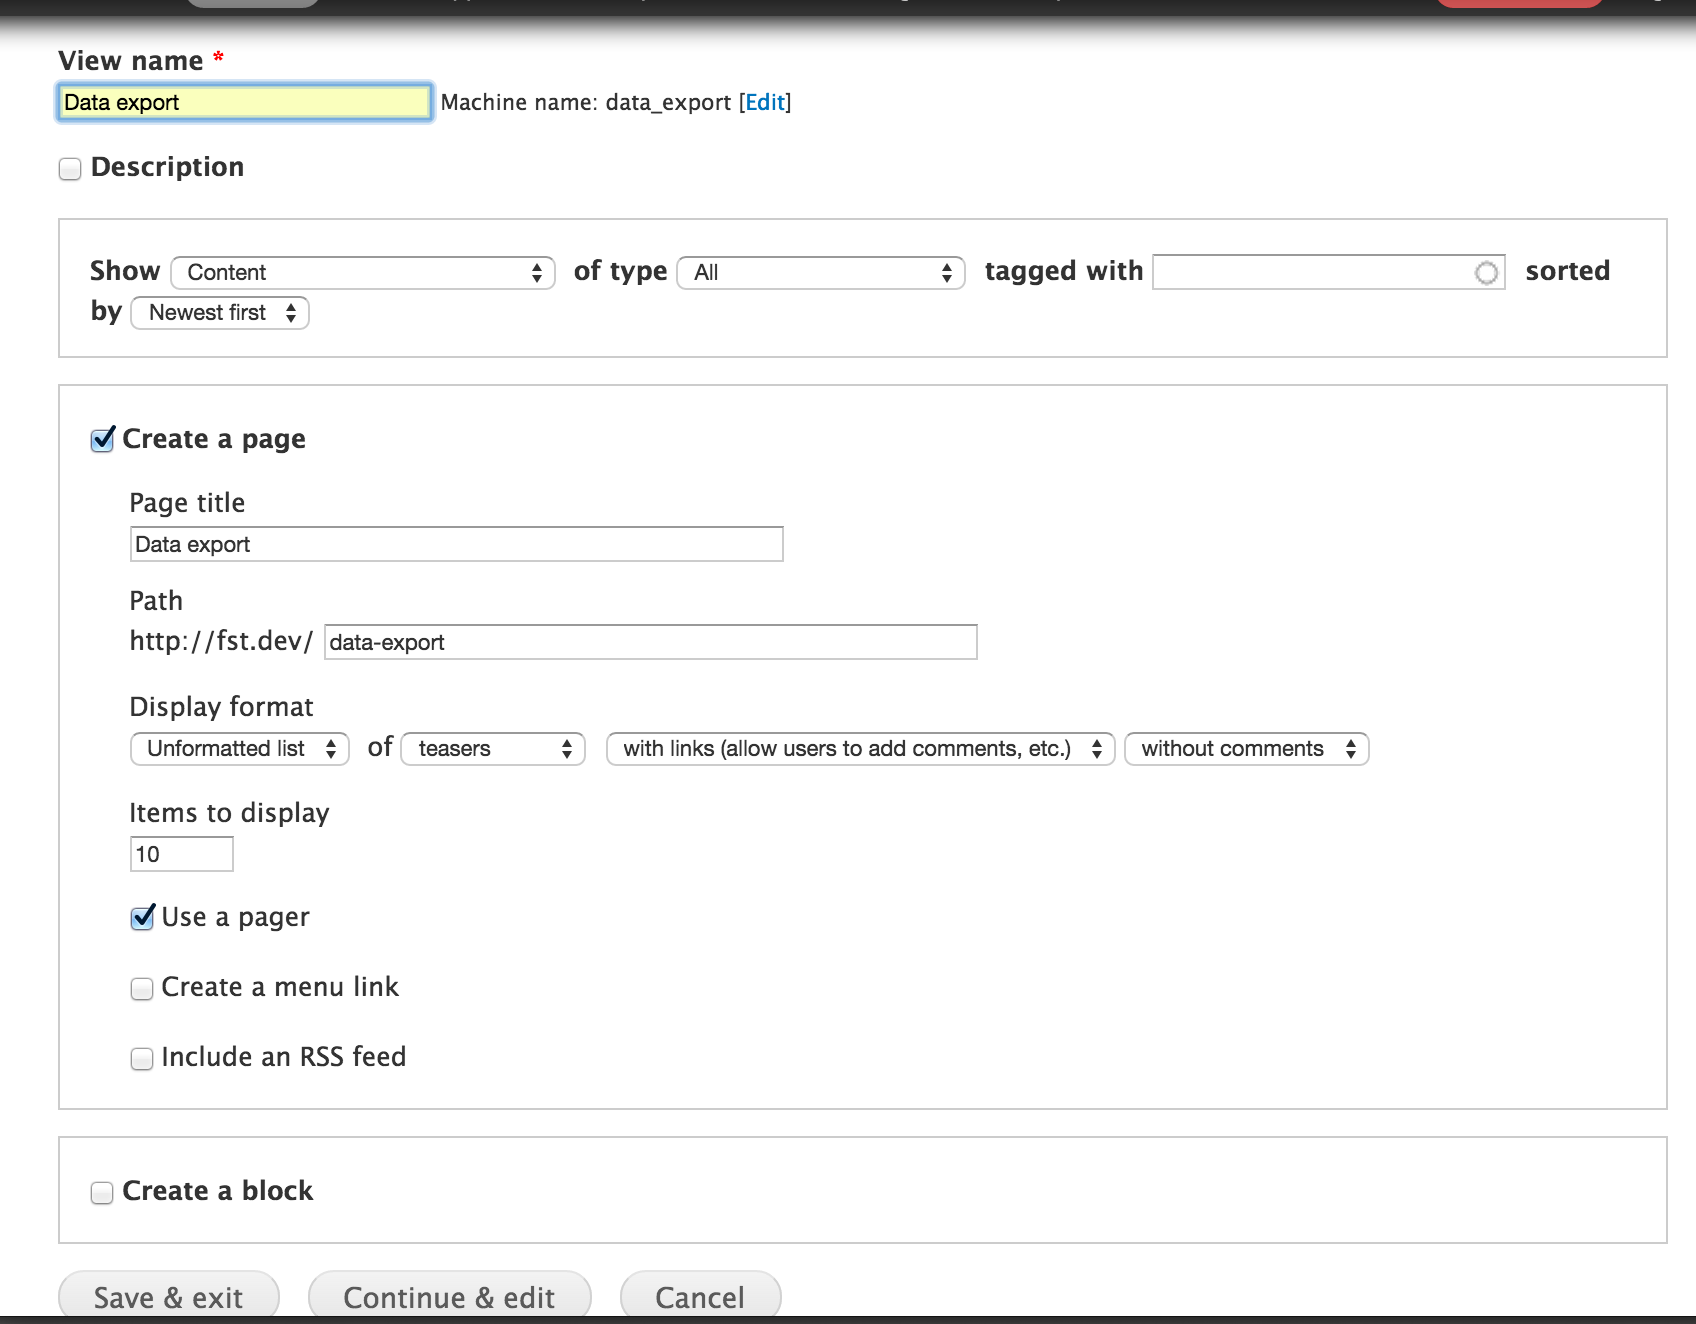
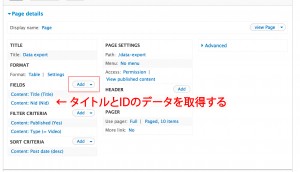
2.新しくViewを作成する
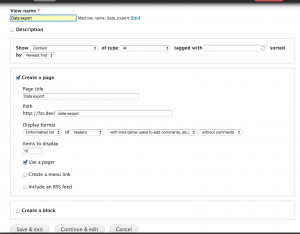
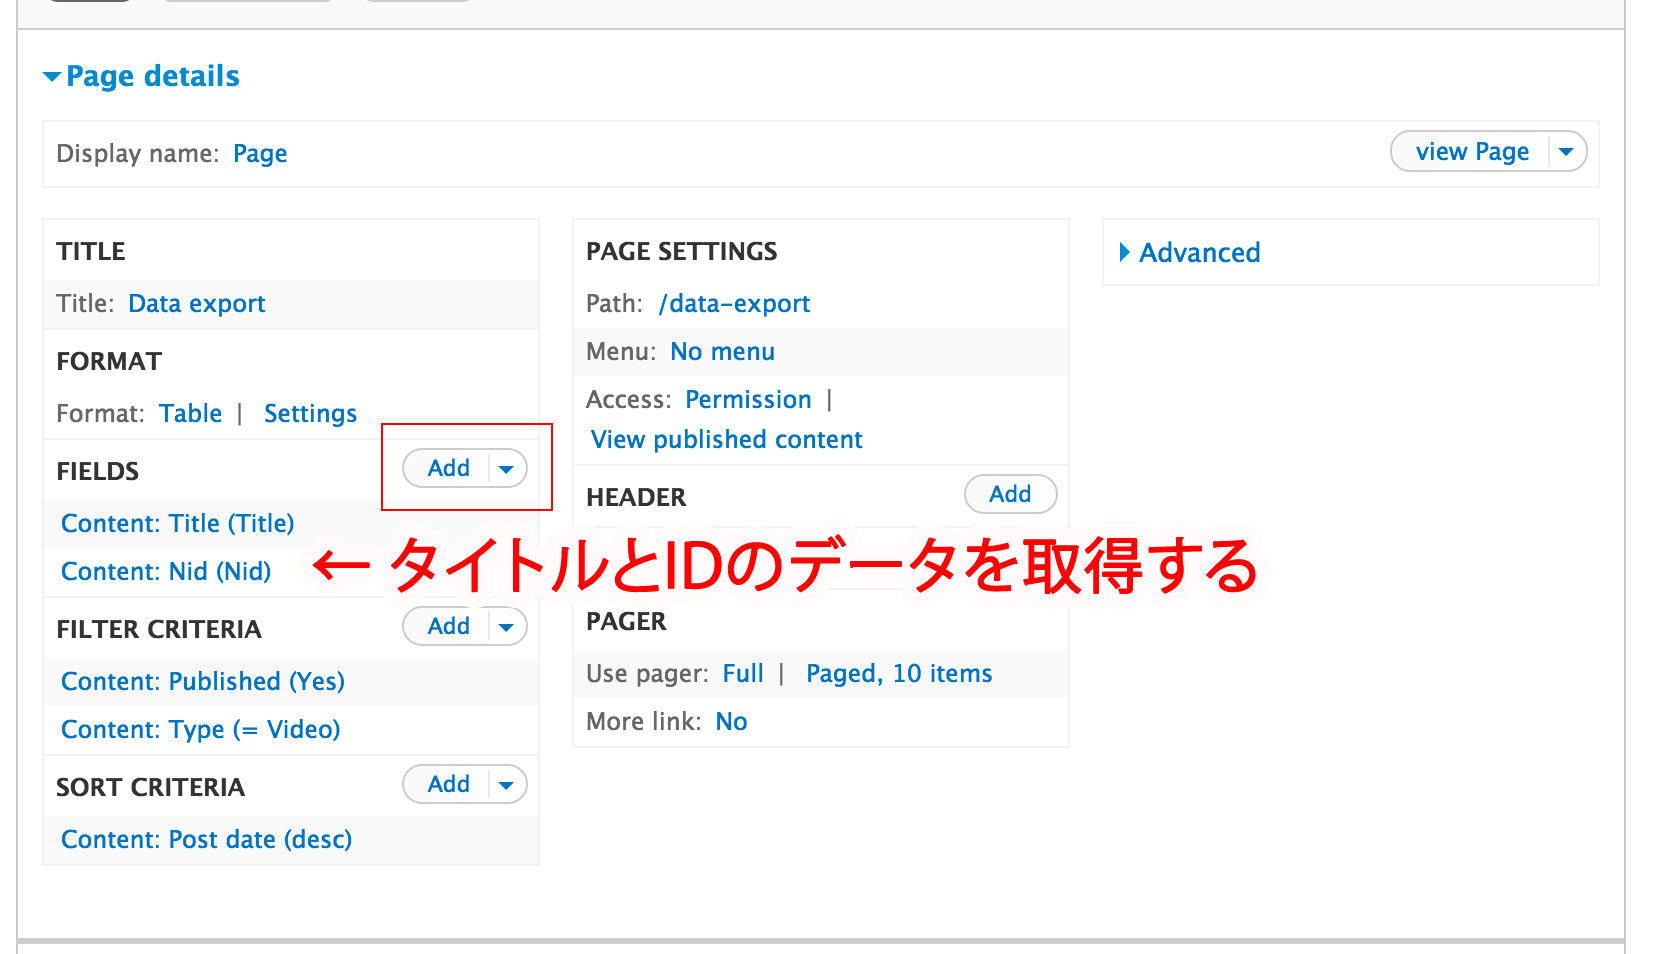
3.Viewで取得したい項目を追加
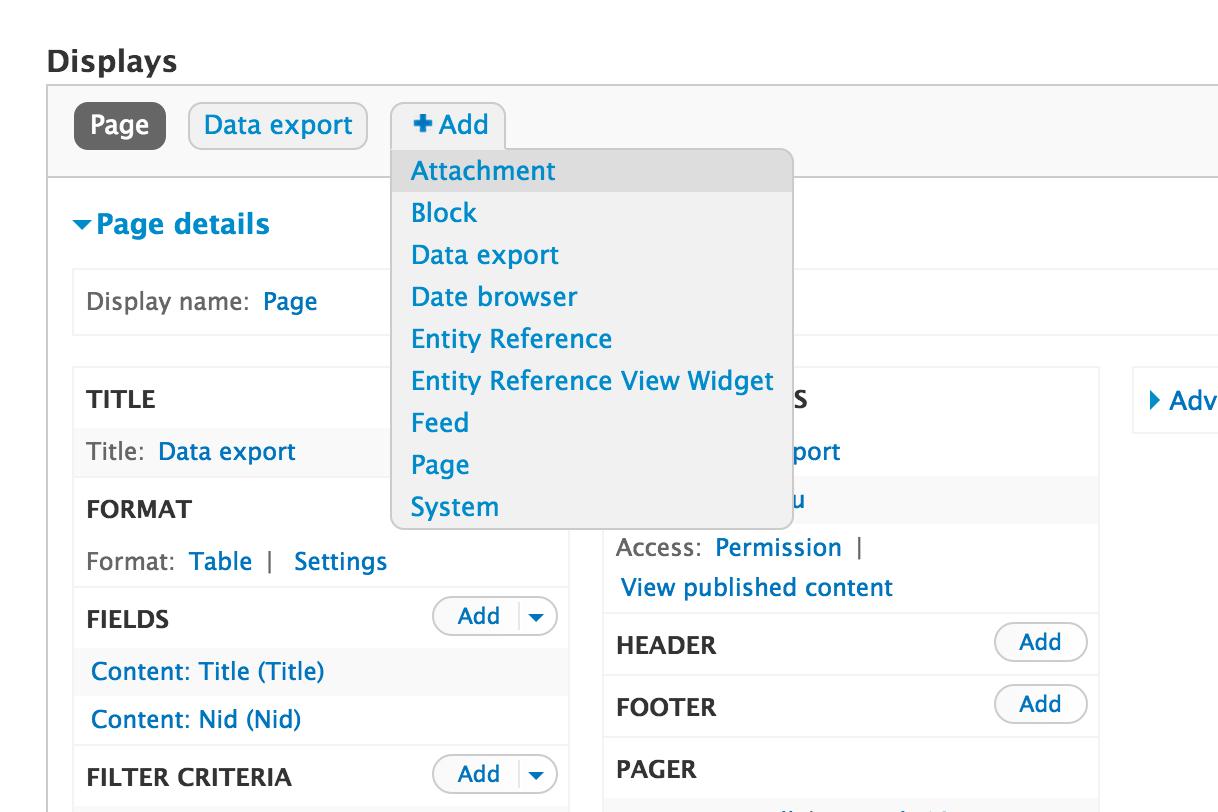
4.エクスポート用のCSVを追加

5.Pathを追加して終了
動画で詳しく説明しているので、こちらもどうぞ
https://www.youtube.com/watch?v=ssOF3nPgcfc
Twitter:
Warning: Undefined array key "Twitter" in /home/sazaeau/mizoshiri.com/public_html/blog.mizoshiri.com/wp-content/plugins/sns-count-cache/sns-count-cache.php on line 2897
0 | Facebook: 0 | Google Plus:
Warning: Undefined array key "Google+" in /home/sazaeau/mizoshiri.com/public_html/blog.mizoshiri.com/wp-content/plugins/sns-count-cache/sns-count-cache.php on line 2897
0 | Hatena: 1 | Pocket: 4 | Total: 5 | Feedly: 0
AD:
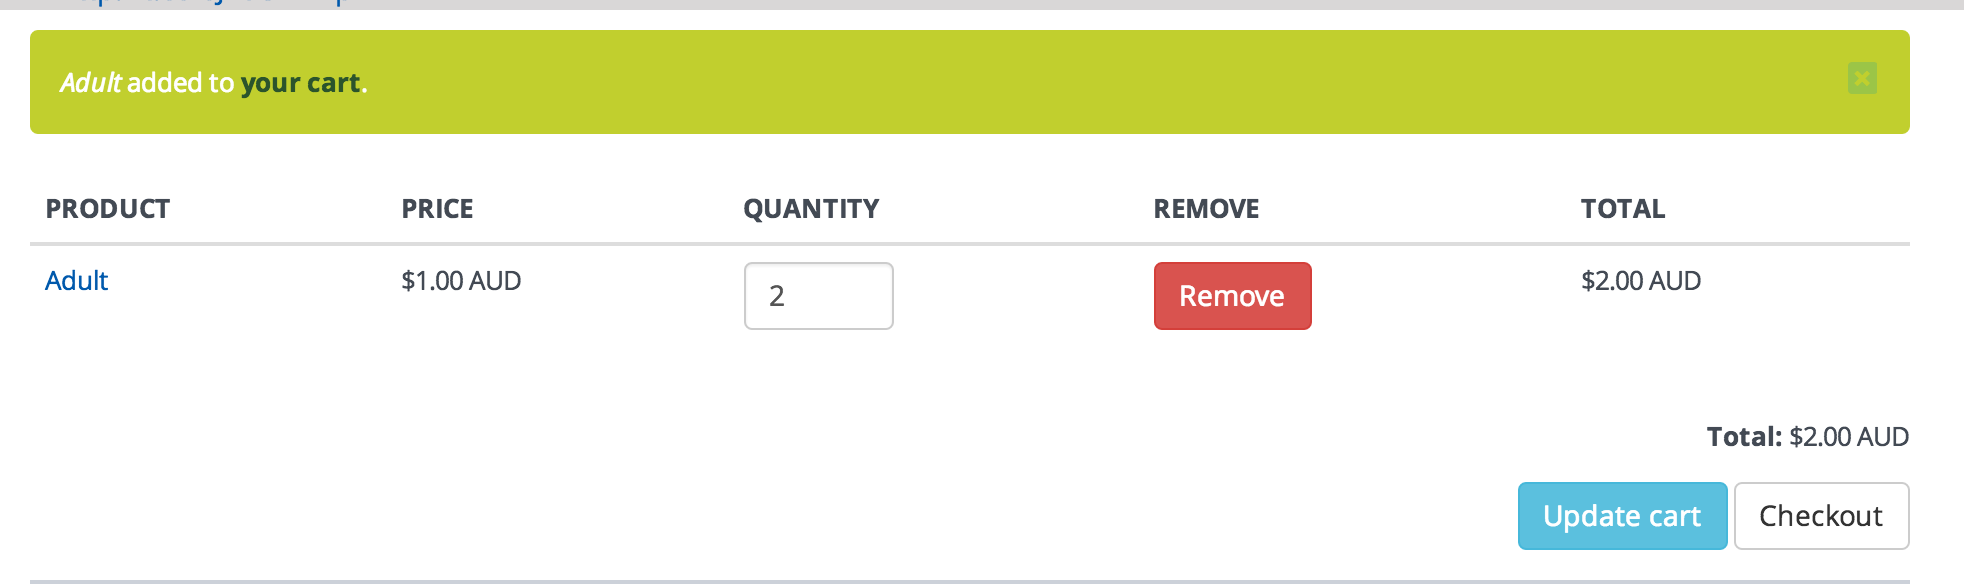
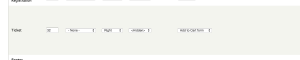
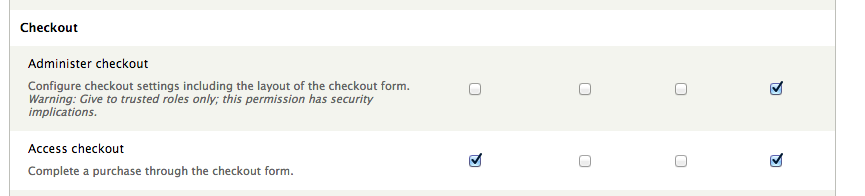
/admin/people/permissionsに行って、”Access checkout”を”ANONYMOUS USER”にも権限をあたえればOKです。
Cartページ
Twitter:
Warning: Undefined array key "Twitter" in /home/sazaeau/mizoshiri.com/public_html/blog.mizoshiri.com/wp-content/plugins/sns-count-cache/sns-count-cache.php on line 2897
0 | Facebook: 0 | Google Plus:
Warning: Undefined array key "Google+" in /home/sazaeau/mizoshiri.com/public_html/blog.mizoshiri.com/wp-content/plugins/sns-count-cache/sns-count-cache.php on line 2897
0 | Hatena: 0 | Pocket: 0 | Total: 0 | Feedly: 0
AD:
キャッシュ
|
|
drush cc all #すべてのキャッシュをクリア drush cc css-js #cssとjsのキャッシュをクリア drush cr #Drupal8からすべてのキャッシュをクリア |
Module系
-y;をつけるといちいちyを入力してくれないので、便利ですよ。
|
|
drush dis rules -y --uri=http://yourdomain.com #Domainを指定しての更新 drush en commerce commerce -y; // enでやると自動でダウンロードもしてくれるので便利です。 |
Admin系
|
|
drush uli //下記のURLのドメイン部分を書き換えてサイトにアクセスとadmin(user=1)で自動ログインできます。 http://default/user/reset/1/11111/1xx-JaK-casad-sadasdade2#FF/login |
Twitter:
Warning: Undefined array key "Twitter" in /home/sazaeau/mizoshiri.com/public_html/blog.mizoshiri.com/wp-content/plugins/sns-count-cache/sns-count-cache.php on line 2897
0 | Facebook: 0 | Google Plus:
Warning: Undefined array key "Google+" in /home/sazaeau/mizoshiri.com/public_html/blog.mizoshiri.com/wp-content/plugins/sns-count-cache/sns-count-cache.php on line 2897
0 | Hatena: 0 | Pocket: 0 | Total: 0 | Feedly: 0